In-App purchases
Automatic verification and sending of purchase information
Starting Appodeal SDK 3.7.0+, it is possible to automatically verify and submit purchases/subscription to Appodeal, as well as receive purchase information from the Appodeal SDK using Appsflyer.
To activate this feature contact us via email at support@appodeal.com or the live chat, and ask to enable ad roi360 feature
Automatic verification of purchases works with versions of Google Play Billing Library 5-7.
Add the following dependency into your module-level build.gradle:
- Kotlin
- Groovy
buildscript {
    dependencies {
        // ... other project dependencies
        implementation("com.android.billingclient:billing:5.0.0")
        // or
        implementation("com.android.billingclient:billing-ktx:5.0.0")
    }
}
buildscript {
    dependencies {
        // ... other project dependencies
        implementation 'com.android.billingclient:billing:5.0.0'
        // or
        implementation 'com.android.billingclient:billing-ktx:5.0.0'
    }
}
For automatic verification of purchases you need to generate and provide our team with JSON key from Google Cloud Platform, as well as set up the ability to receive information about purchases from Google Play Developer Console.
To do this, you need to perform the following steps:
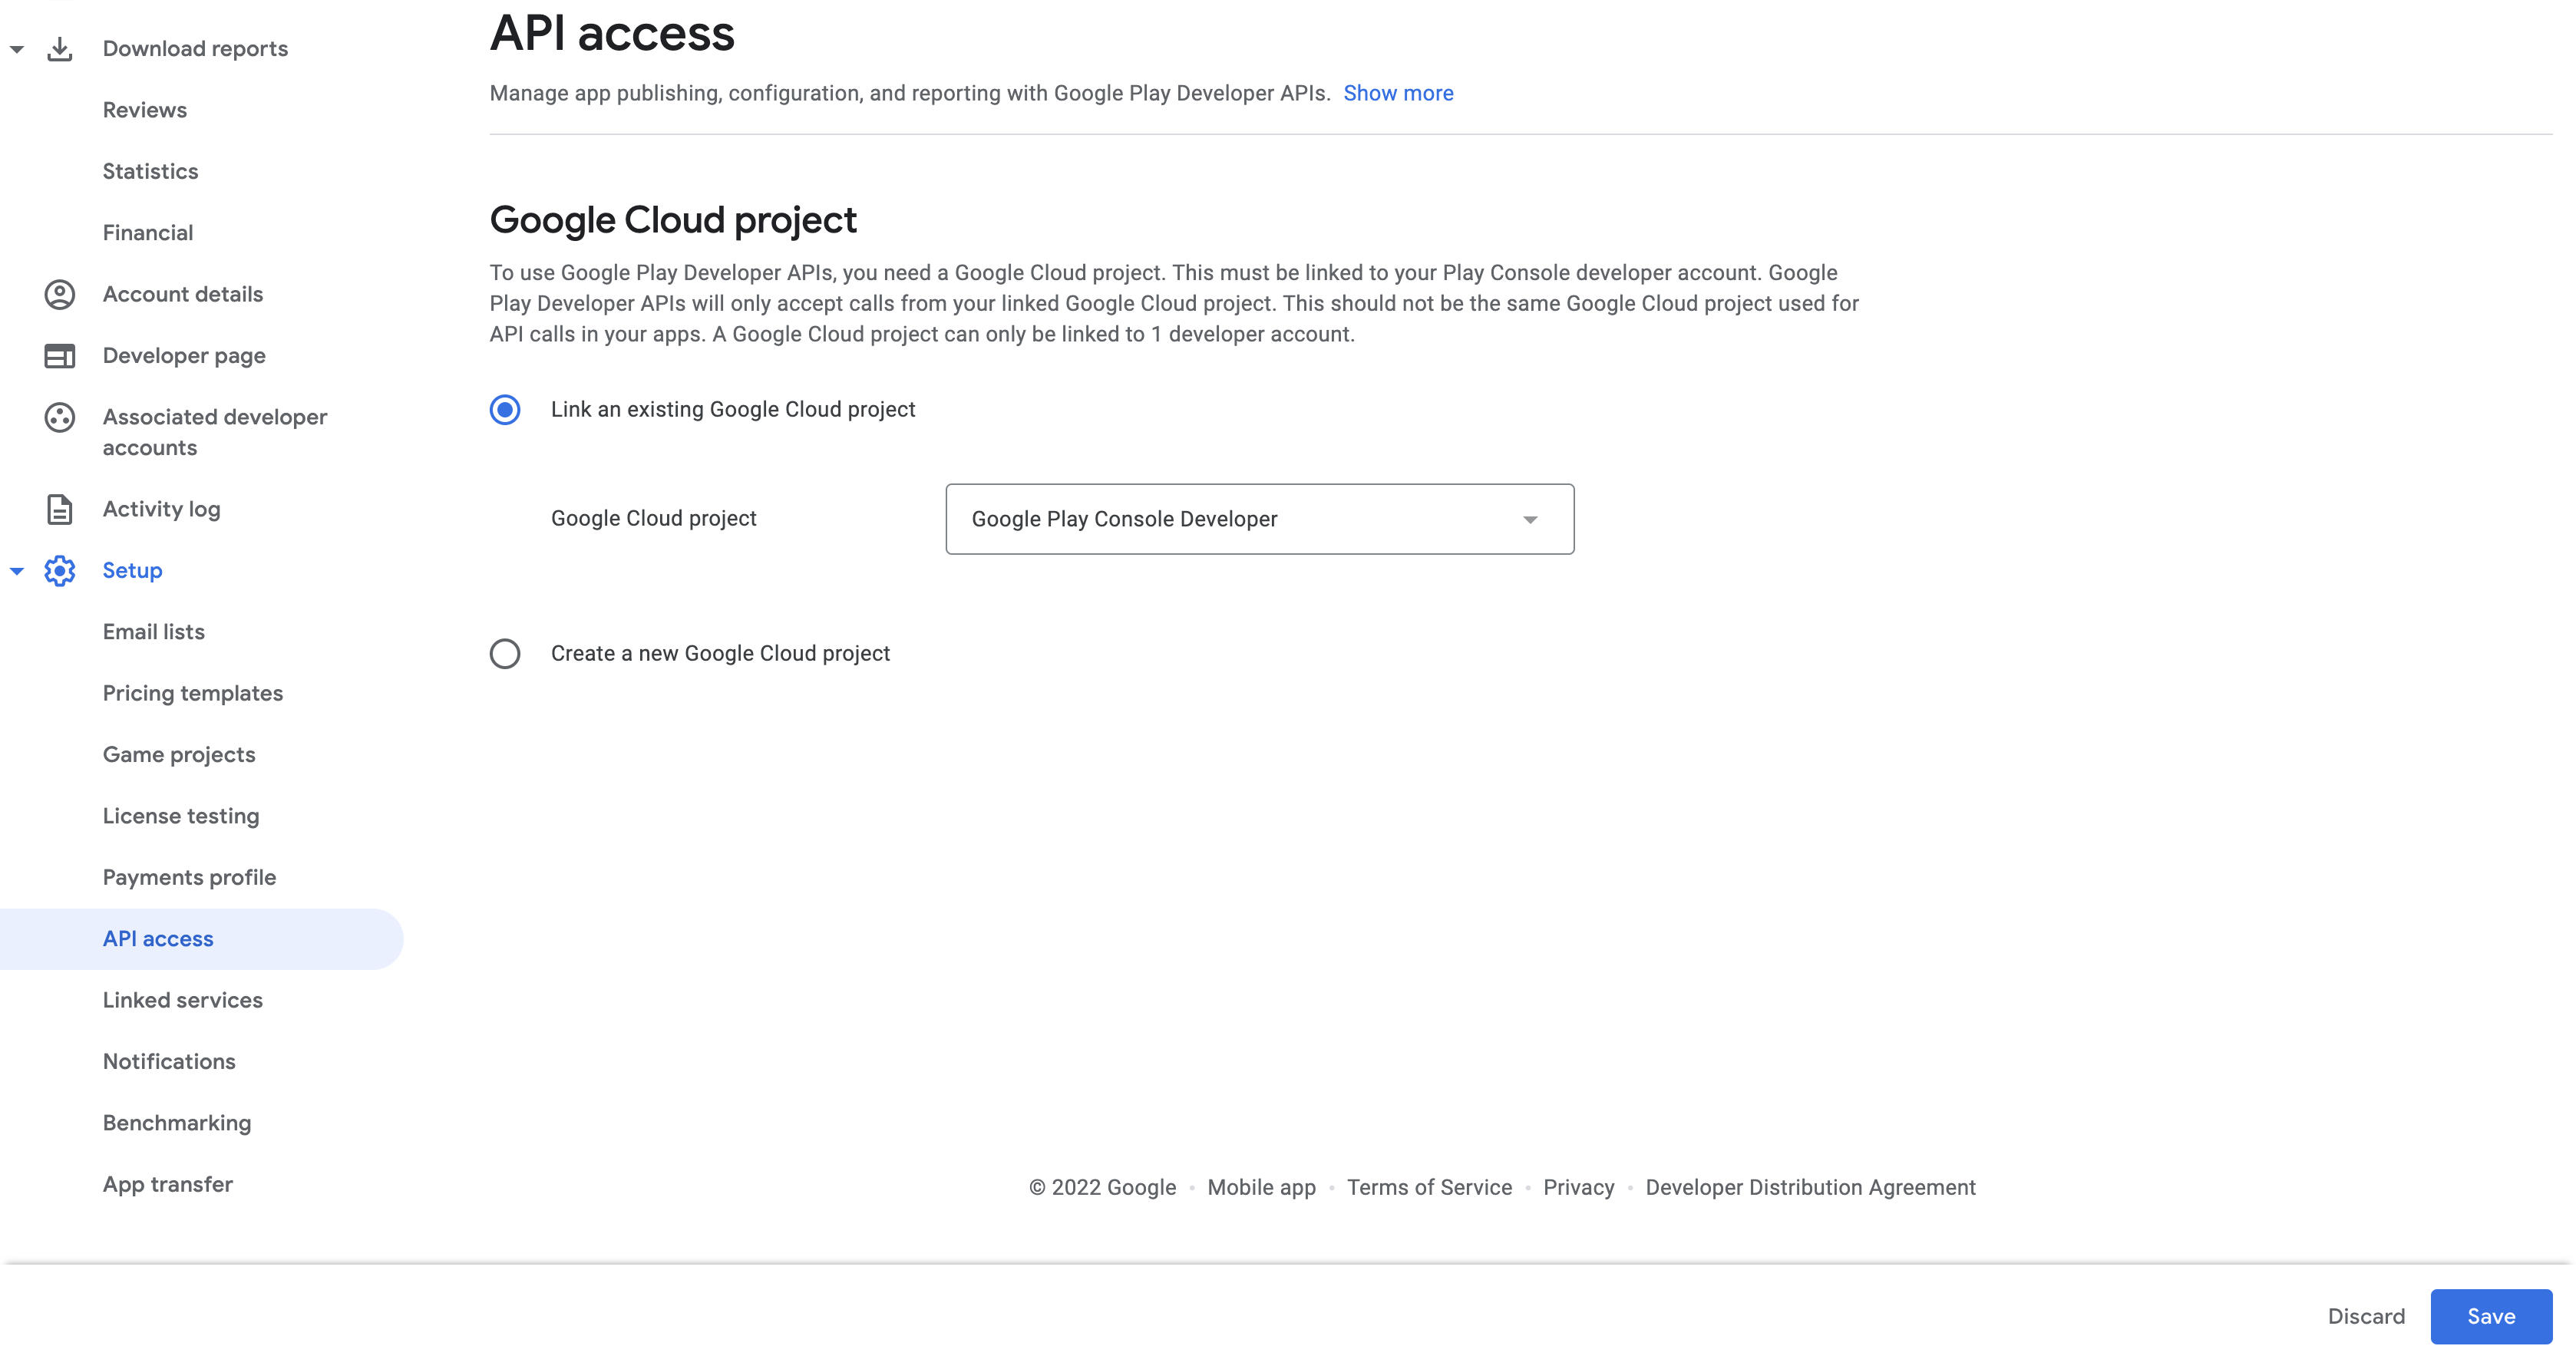
Step 1. link your Google Play Developer Account to Google Cloud Project
- In the Google Play Console, go to your Google Play Developer Account.
- Link the account to your Google Cloud project. For instructions, see this Google help topic.
- Enable the Google Play Developer API. For instructions, see this Google help topic.
Step 2. Configure your Service Account in the Google Cloud Platform
Prerequisites: Access to Google Cloud Platform.
To configure your service account:
2.1 Create or locate the Service Account:
- In the Google Cloud Platform, go to the Service accounts section and click Create Service Account.
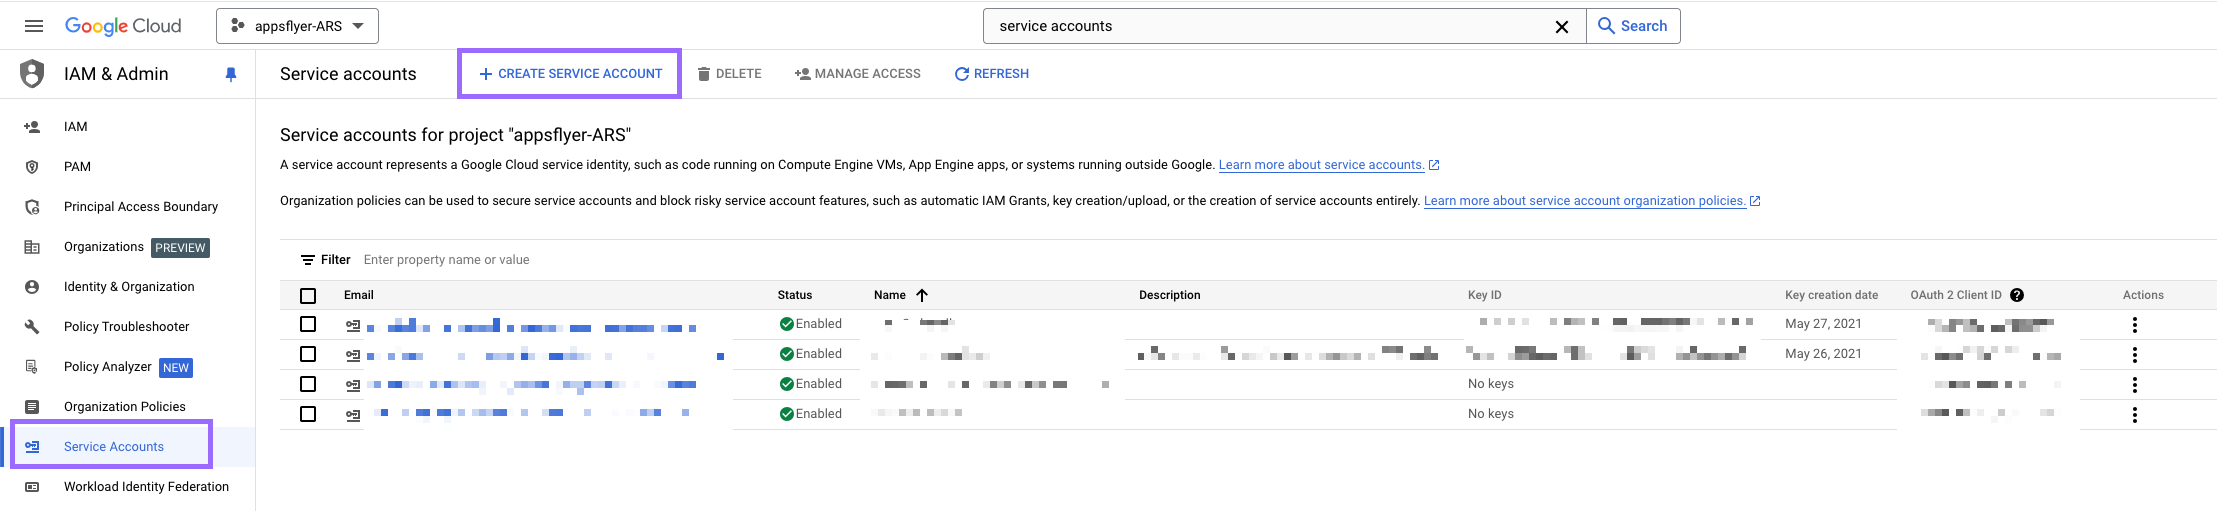
- Complete the service account details.

- Copy the email address and Click Create and continue.
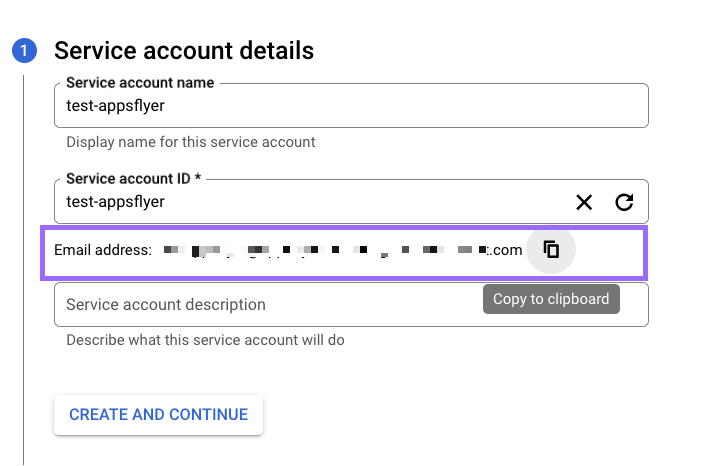
This email you should invite to Google Play Console(see below)
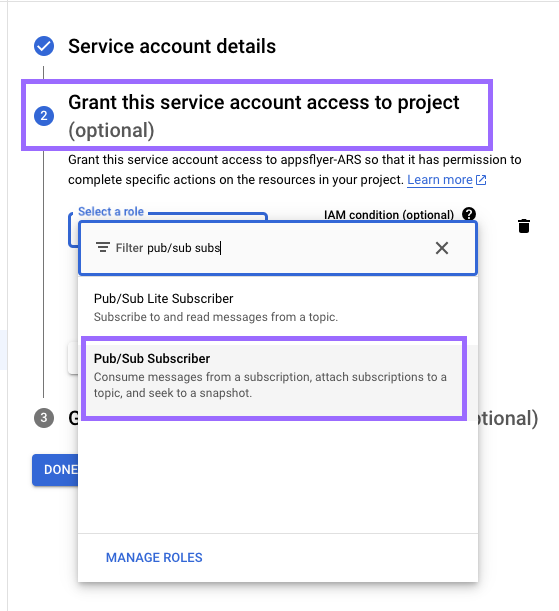
- In the Grant this service account access to the project step, select the Pub/sub subscriber role, after that click Done
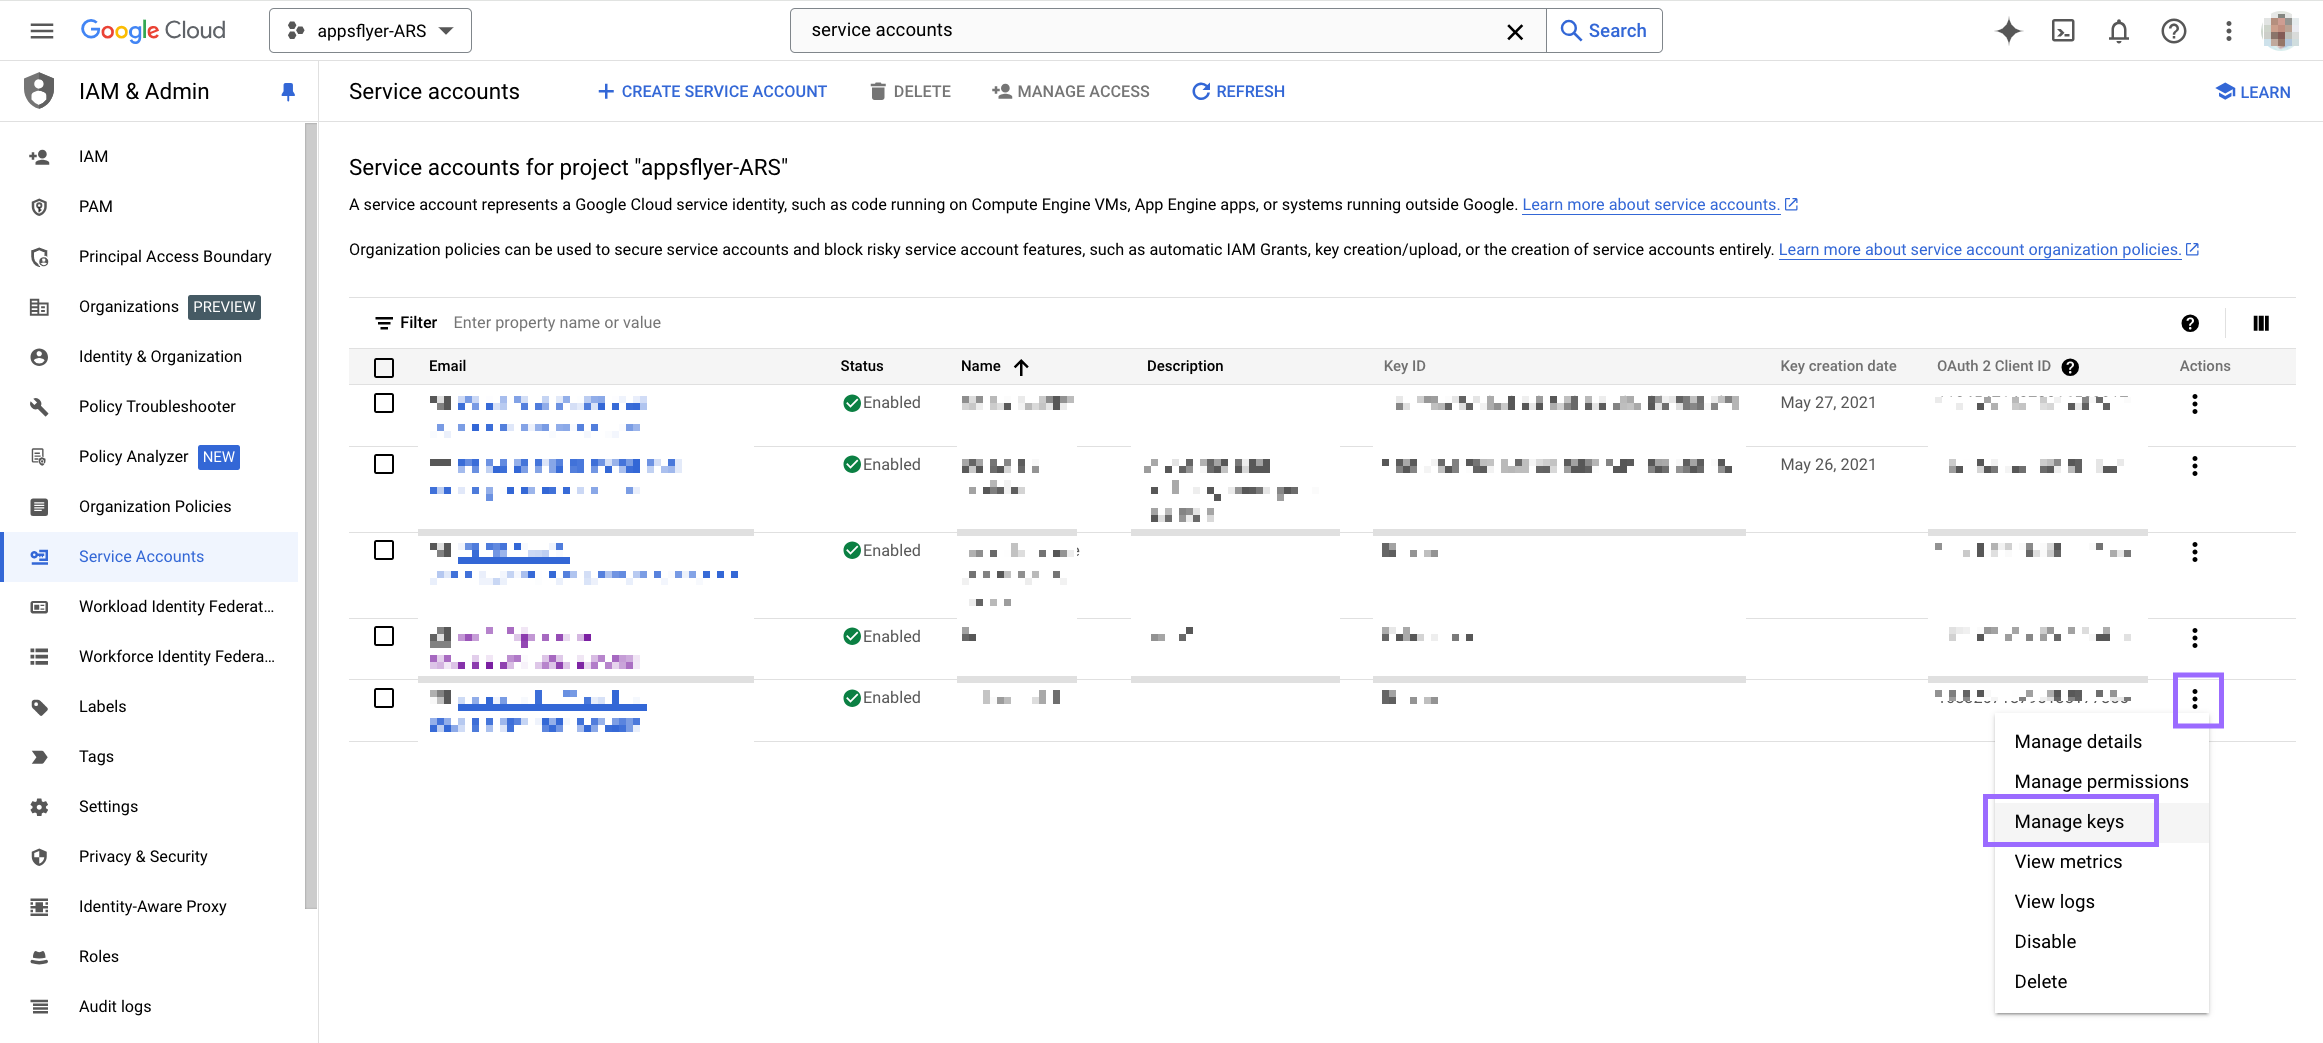
2.2 Download the Service Account Private Key:
In the Google Cloud Platform, go to the Service accounts section, find the account you want (the one you just created) from the list, and click the More actions icon.
- Click Manage keys.
- Click Add key > Create new key.
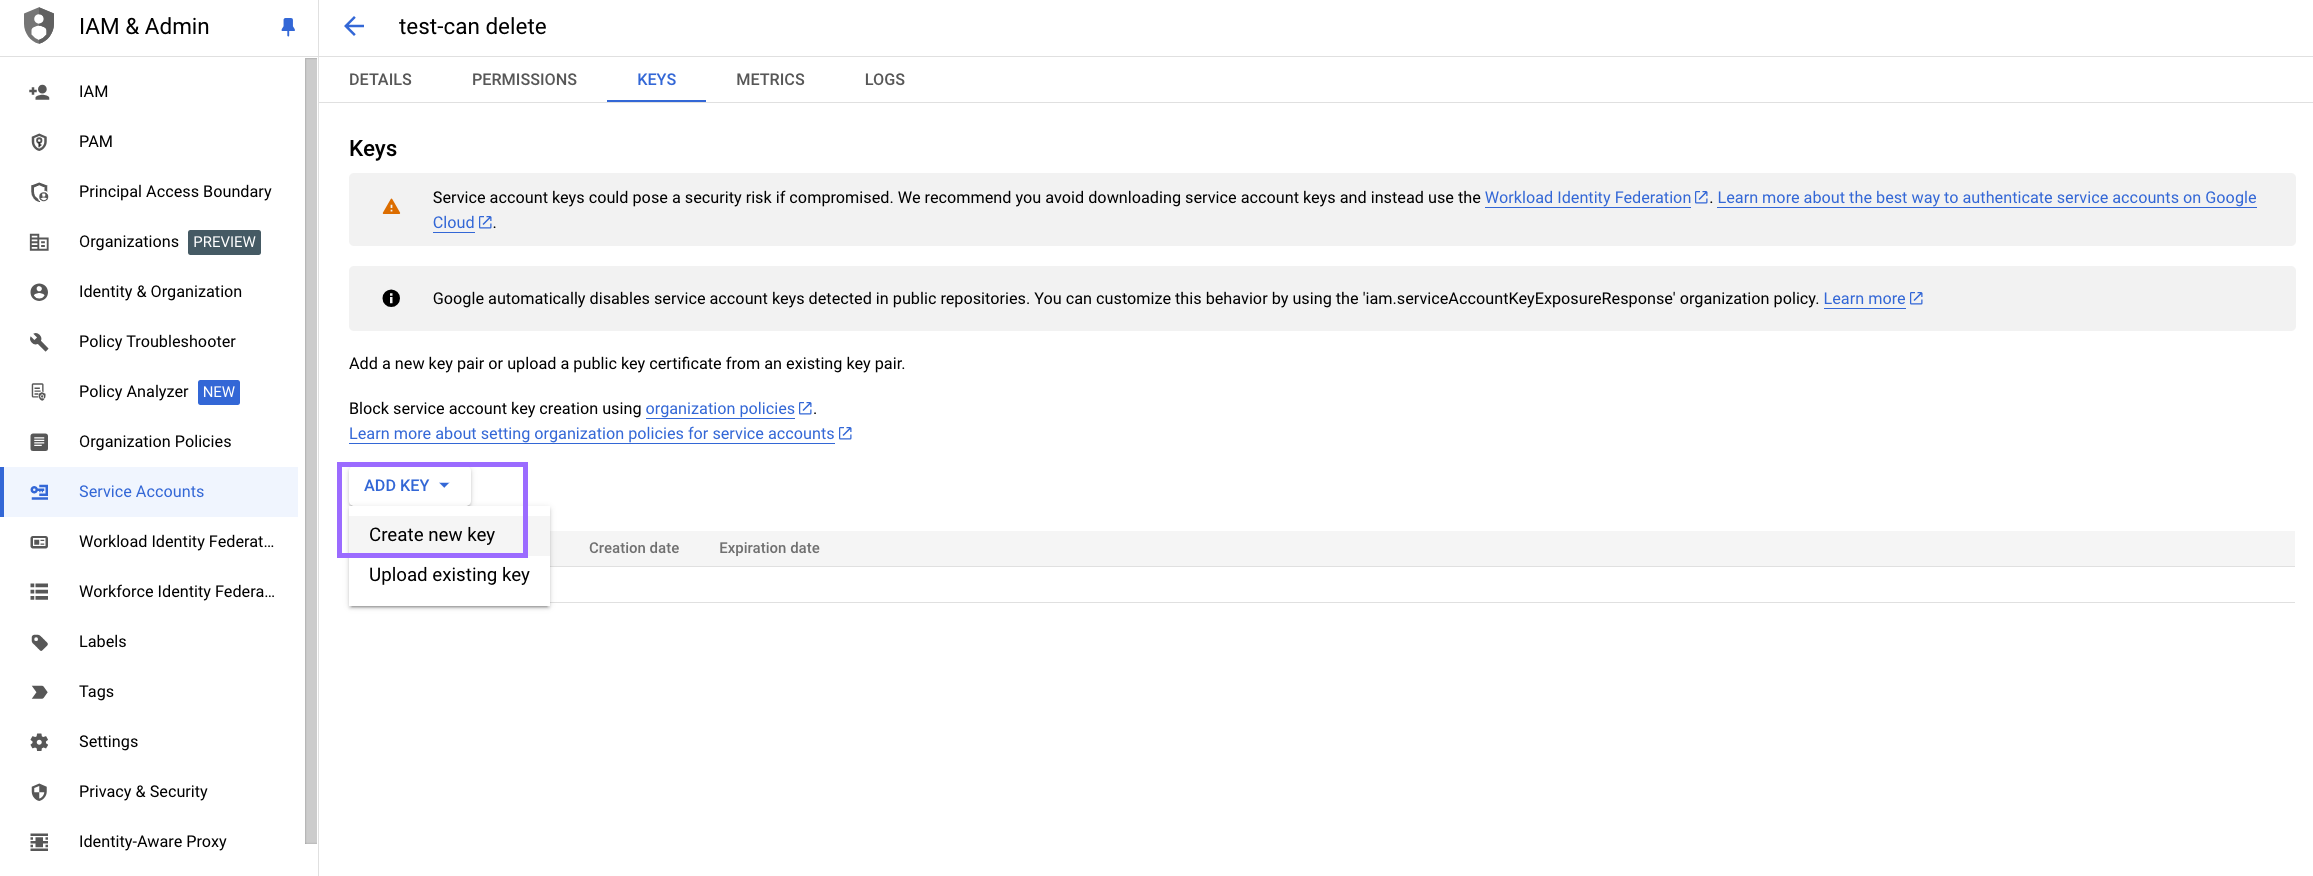
- In the Create private key popup, under Key type, select JSON, and click Create.
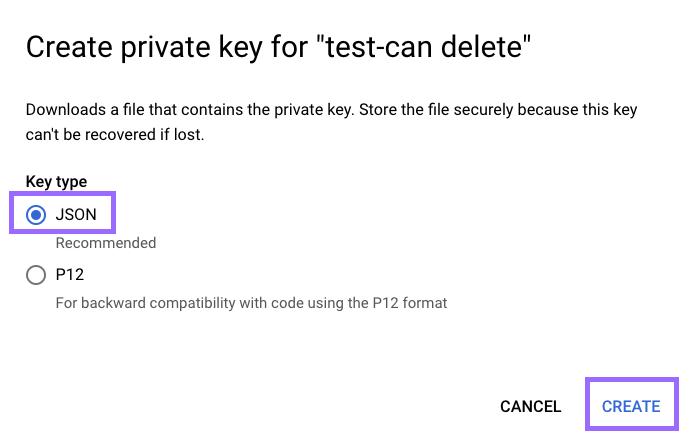
- Click Create. The private key JSON file is downloaded.
Save the JSON key file, which will be uploaded to AppsFlyer later.
You must save the key; it can't be retrieved later. If you don't save it, you will have to create an entirely new key. Please share this JSON file with Appodeal team. We will need it to connect Google Play Console with our Appsflyer account.
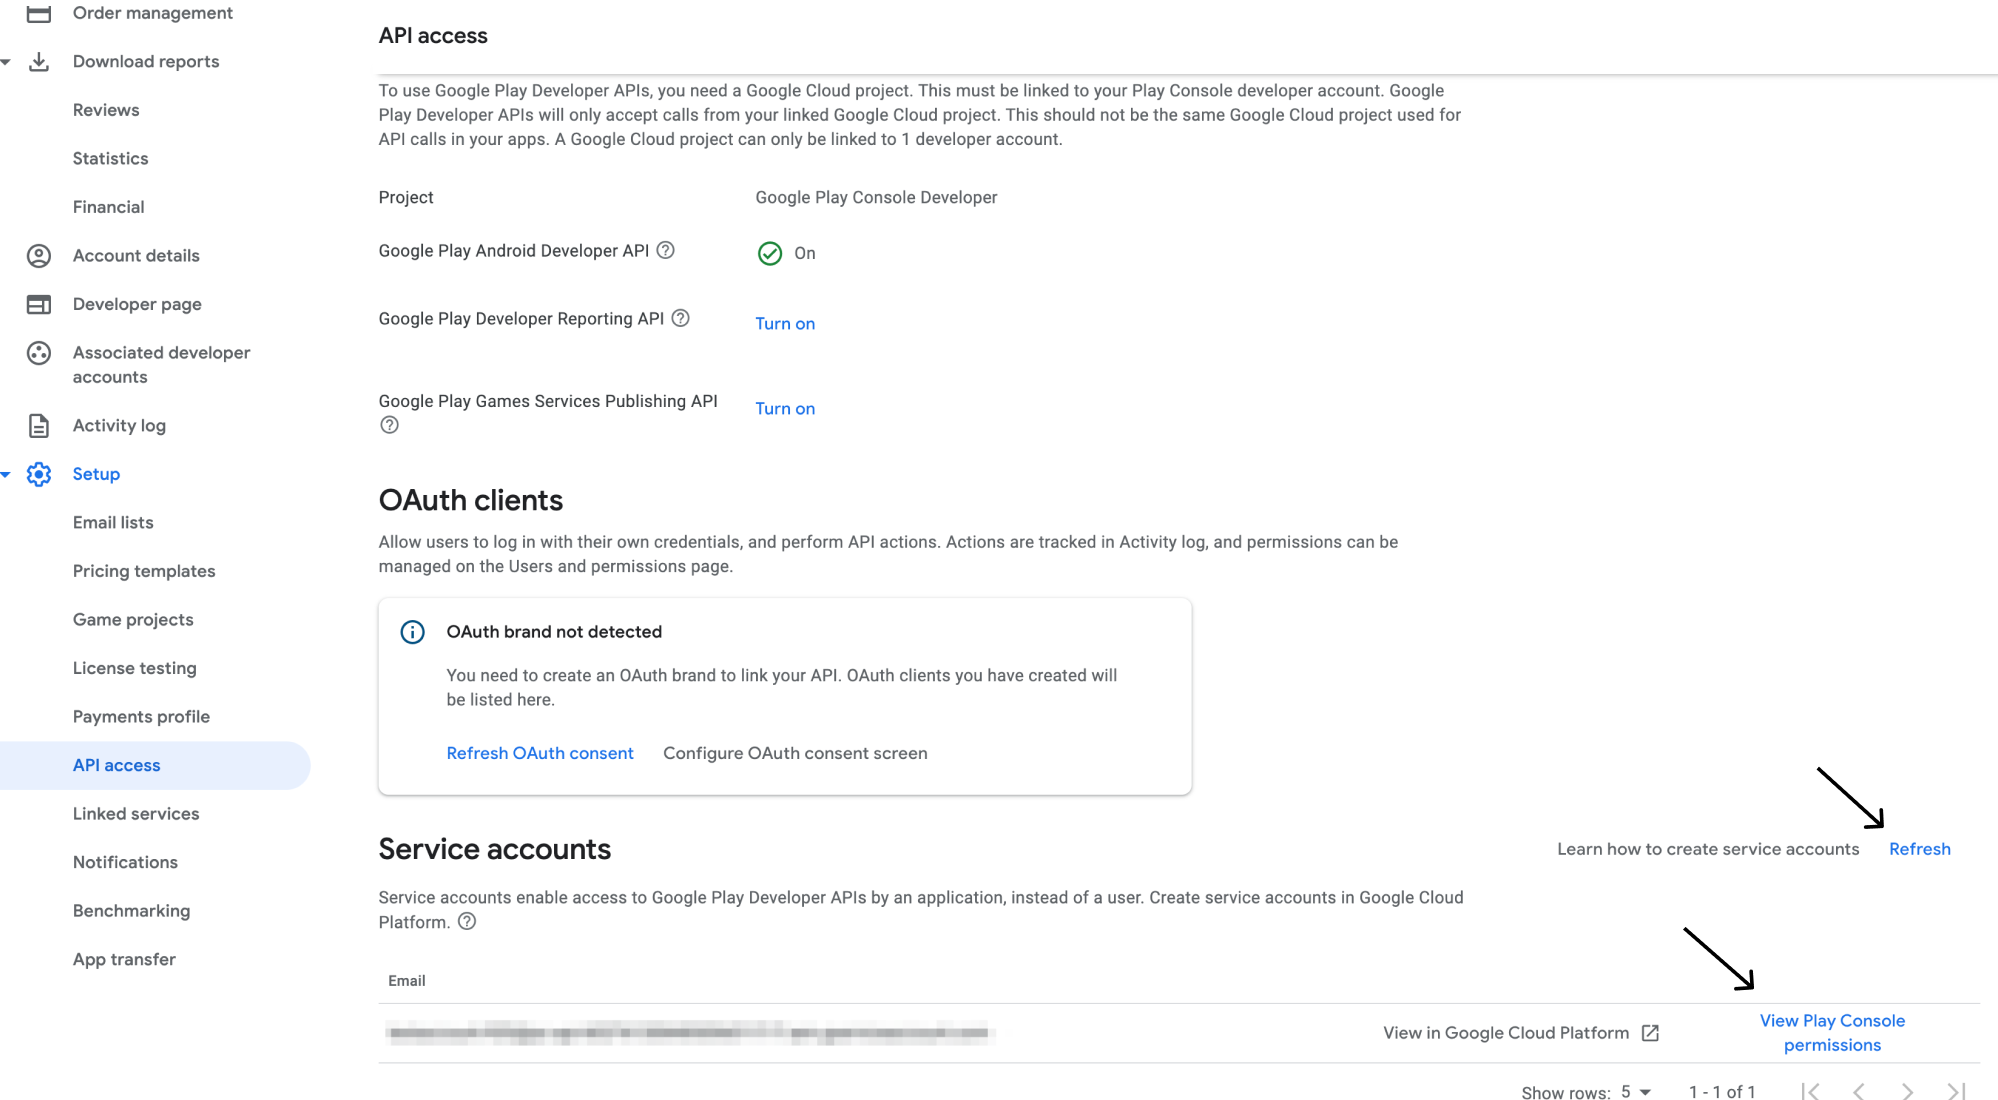
Step 3. Set API access permissions in Google Play Console
Prerequisites: Access to Google Play Console.
It can take time (sometimes even 24 hours) after setting service account credentials and permissions to be able to use them. This may cause you to receive errors in later steps.
To set API access permissions in Google Play Console:
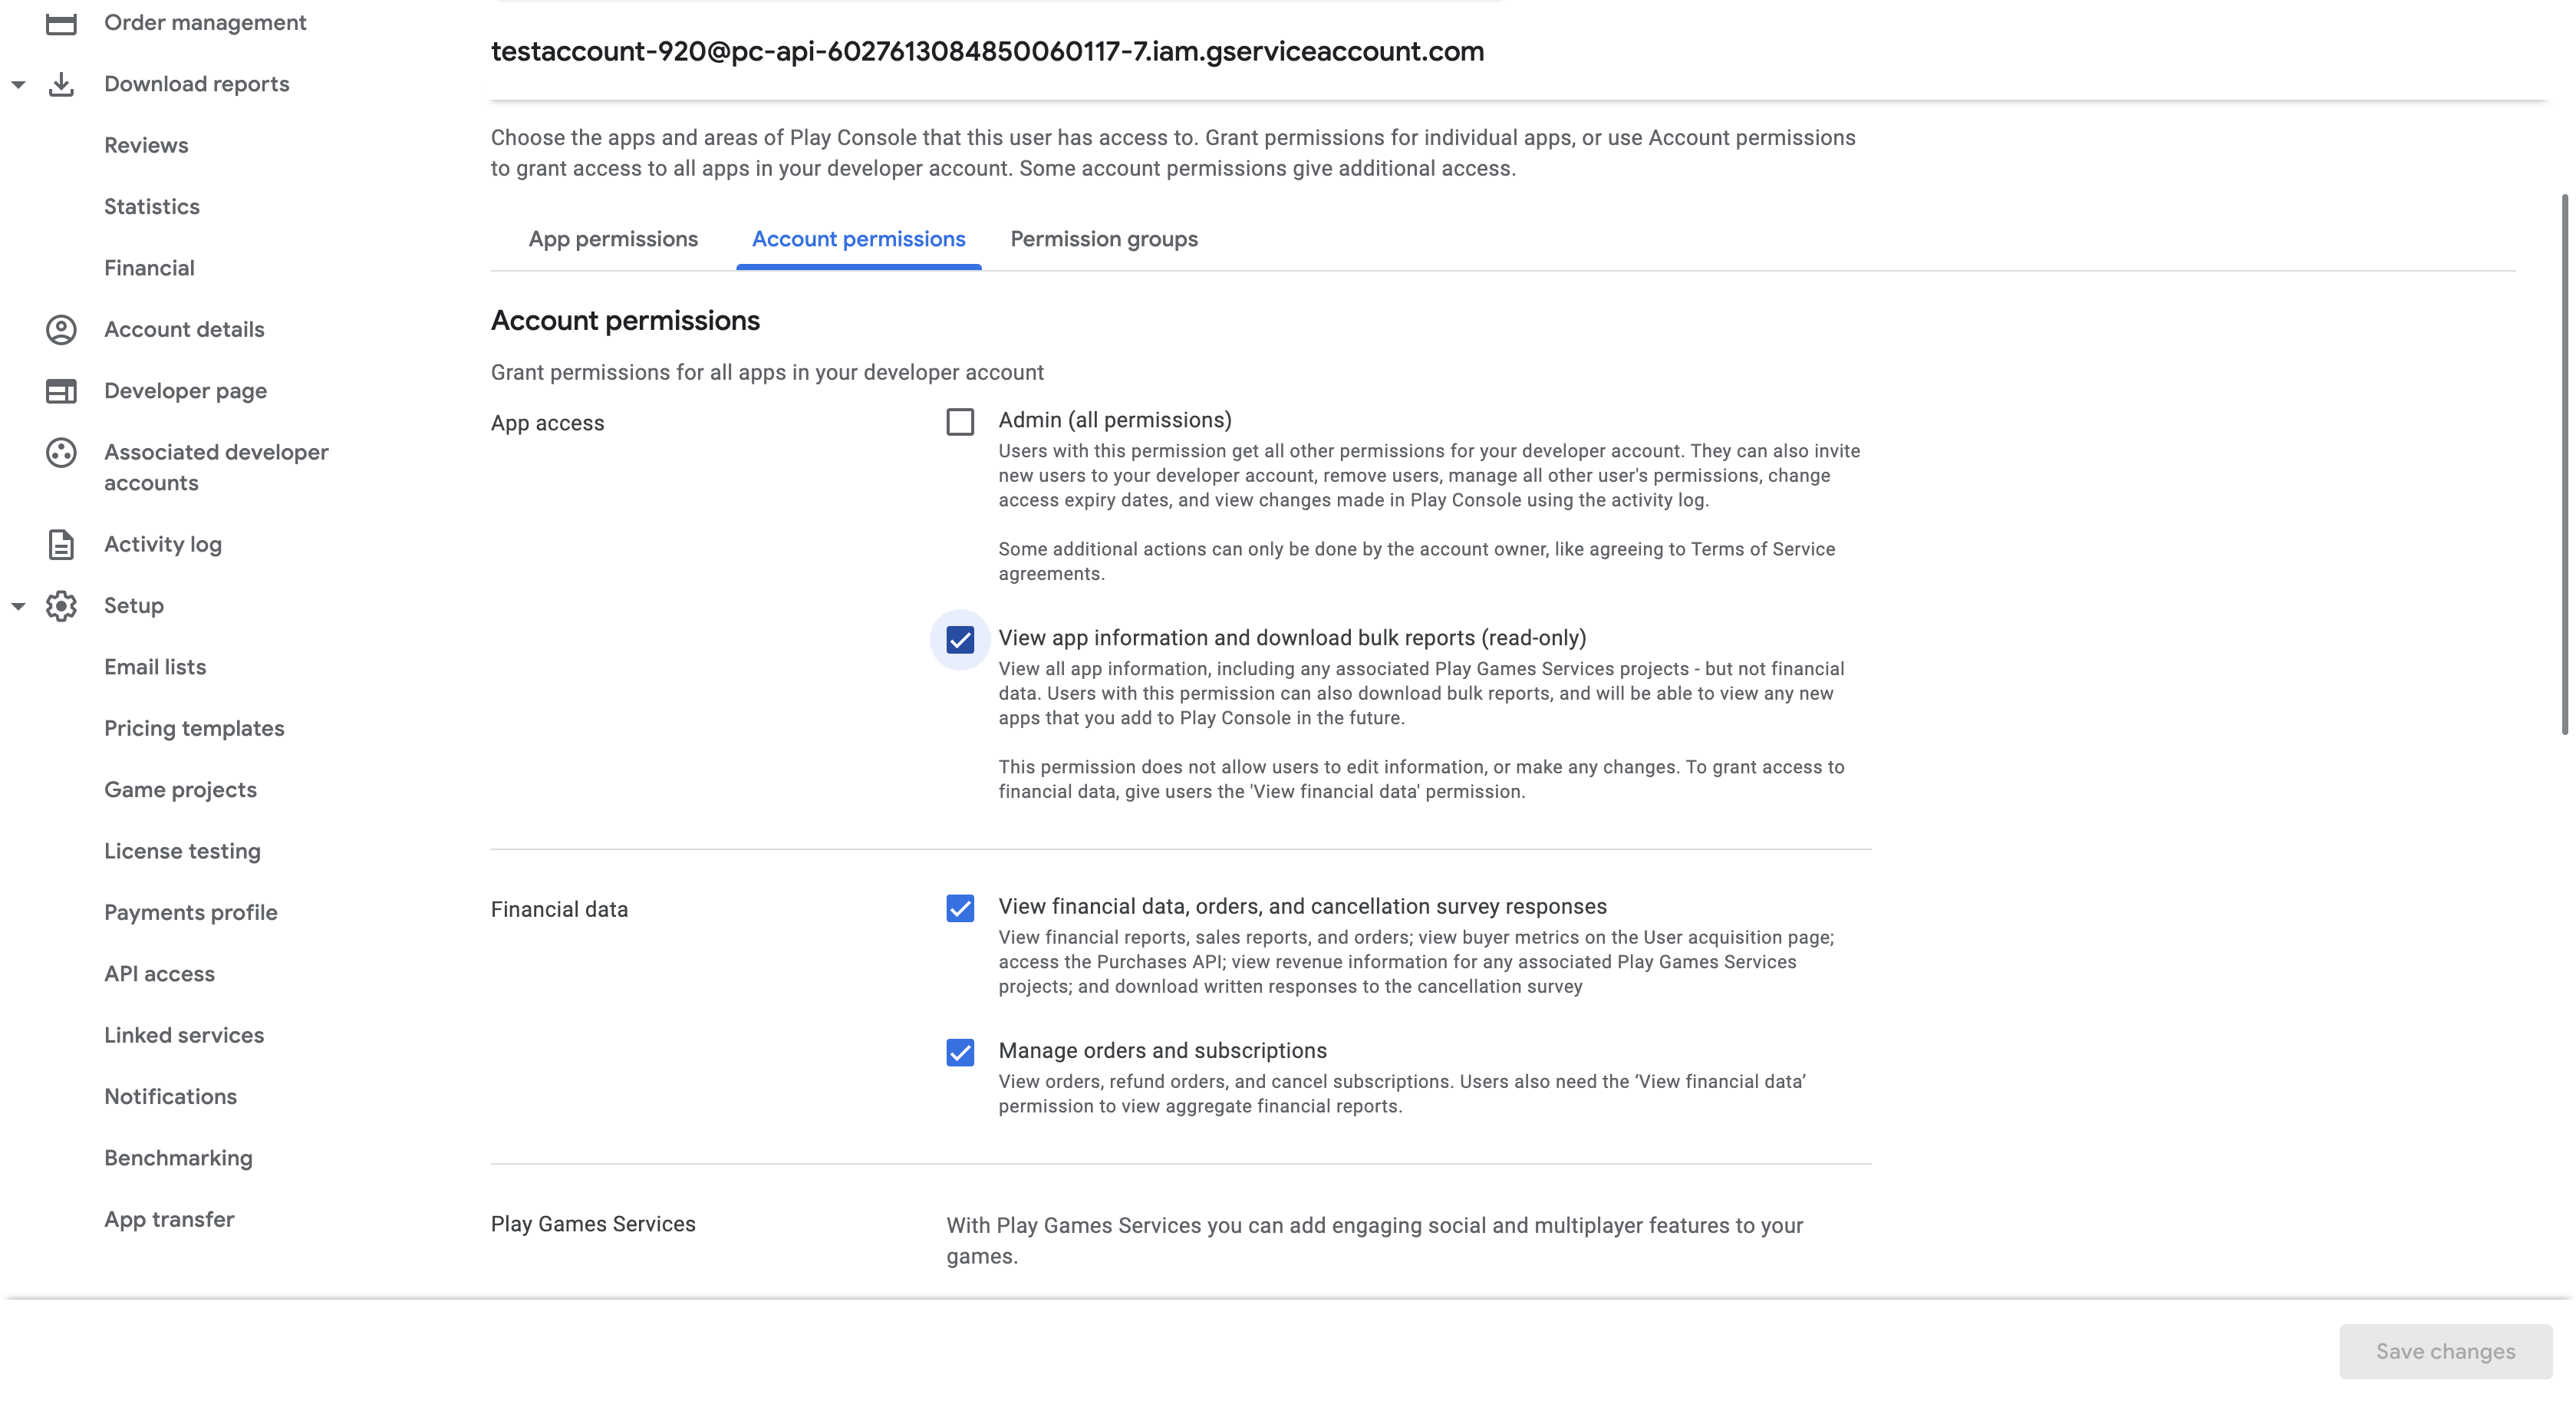
- In the Google Play Console, go to Users and permissions, find the service account you created, and click Invite new users.
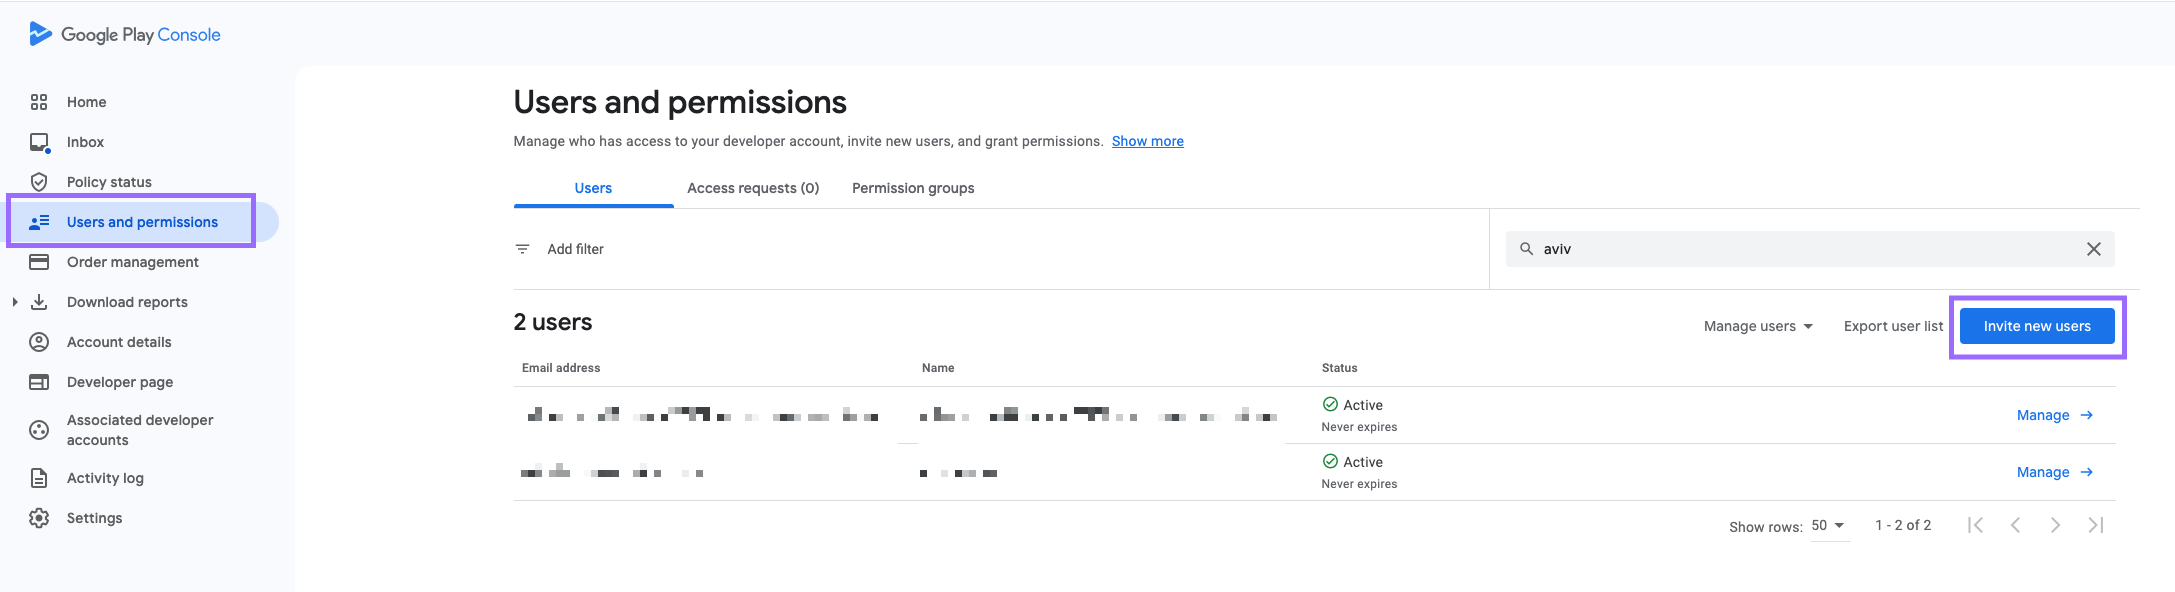
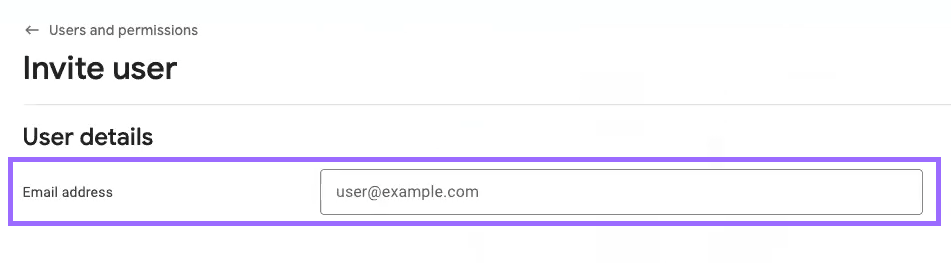
- Enter the Email address that you copied when you configured your service account in step 2.1.3
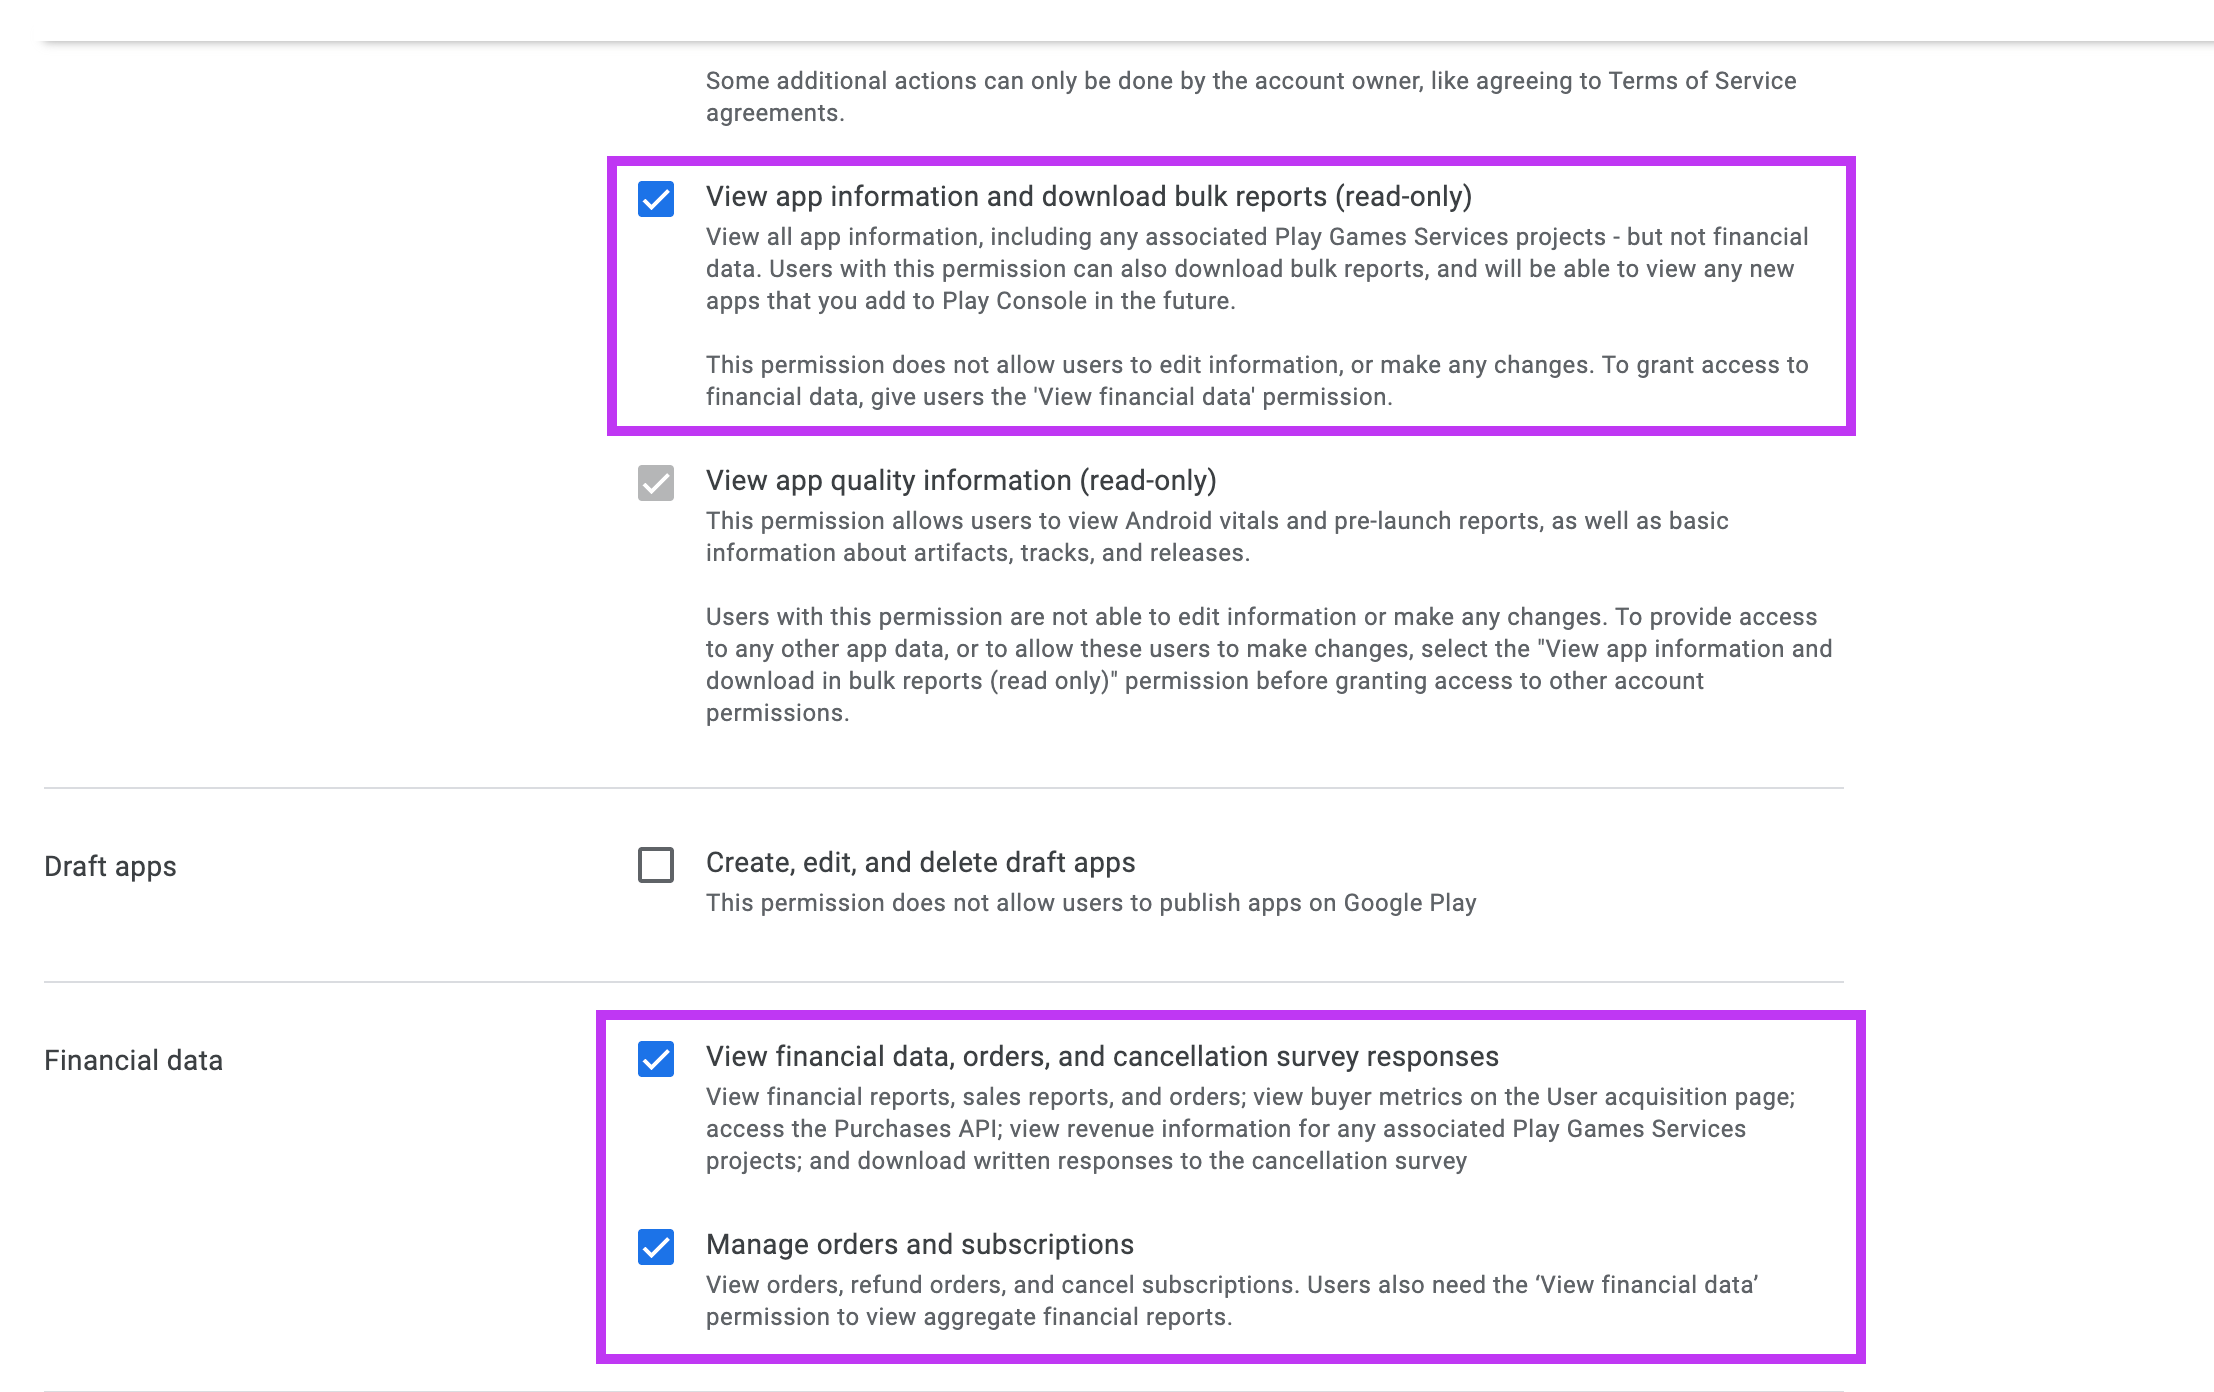
- In the Permissions section, go to the Account permissions tab, and select following:
-
View app information and download bulk reports(read-only)
-
View financial data, orders, and cancellation survey responses.
-
Manage orders and subscriptions.
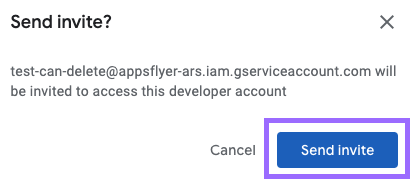
- Click Invite user.
- In the confirmation popup, click Send invite.
Step 4. Send Google Play notifications directly to AppsFlyer
Prerequisites: Access to Google Play Console and AppsFlyer UI.
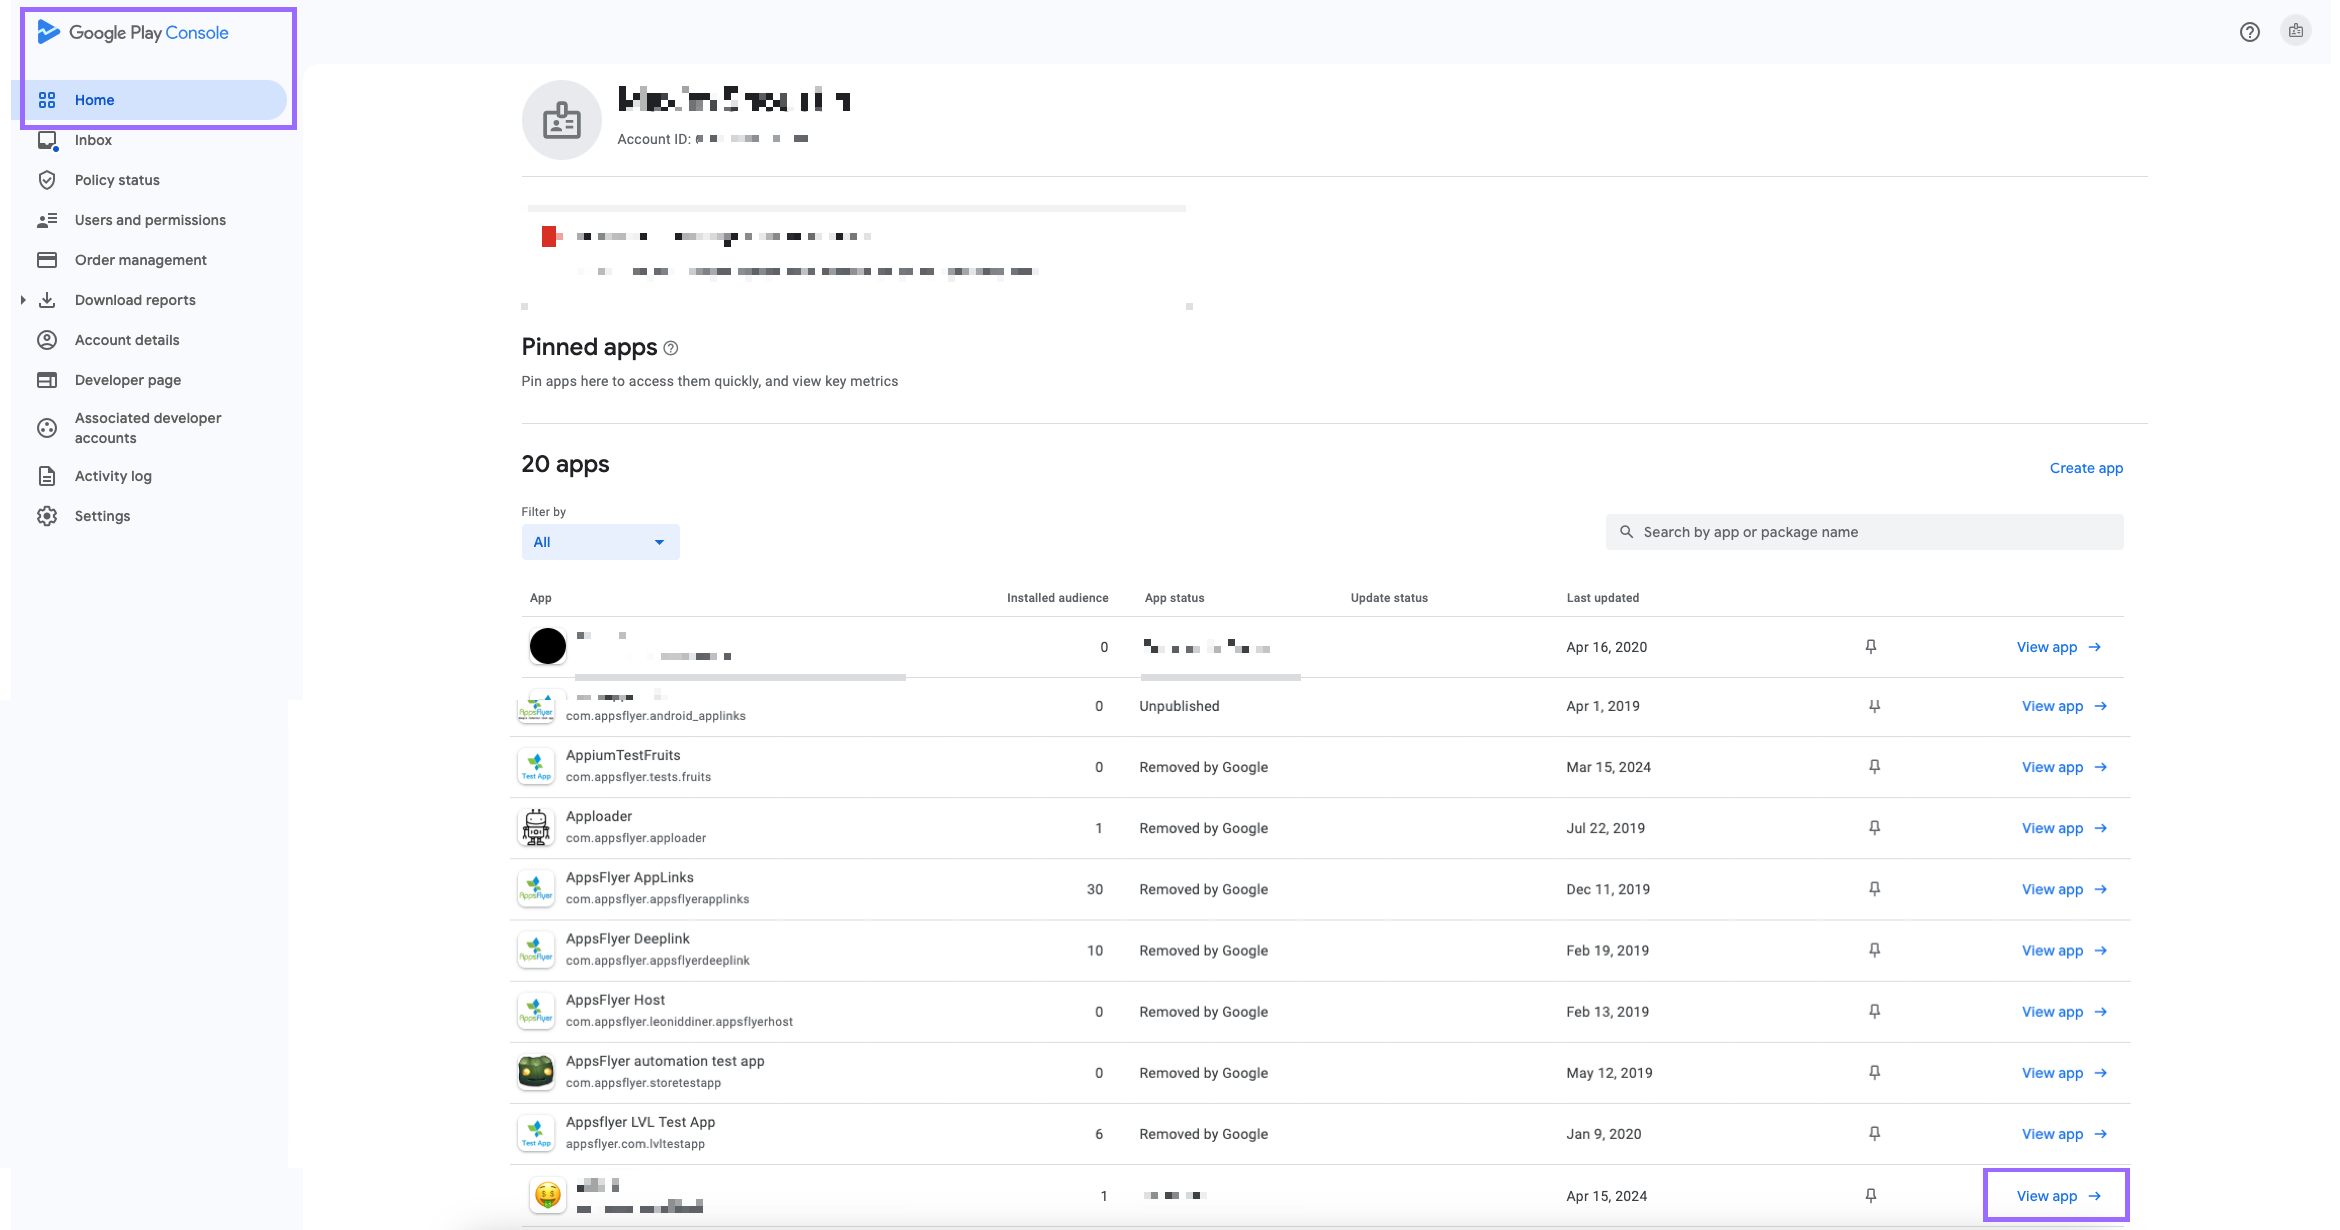
- In Google Play Console > Home, select to view your app. The dashboard opens.
- Go to Monetize with Play > Monetization setup, and in the Google Play Billing section, make sure Enable real-time notification is checked.
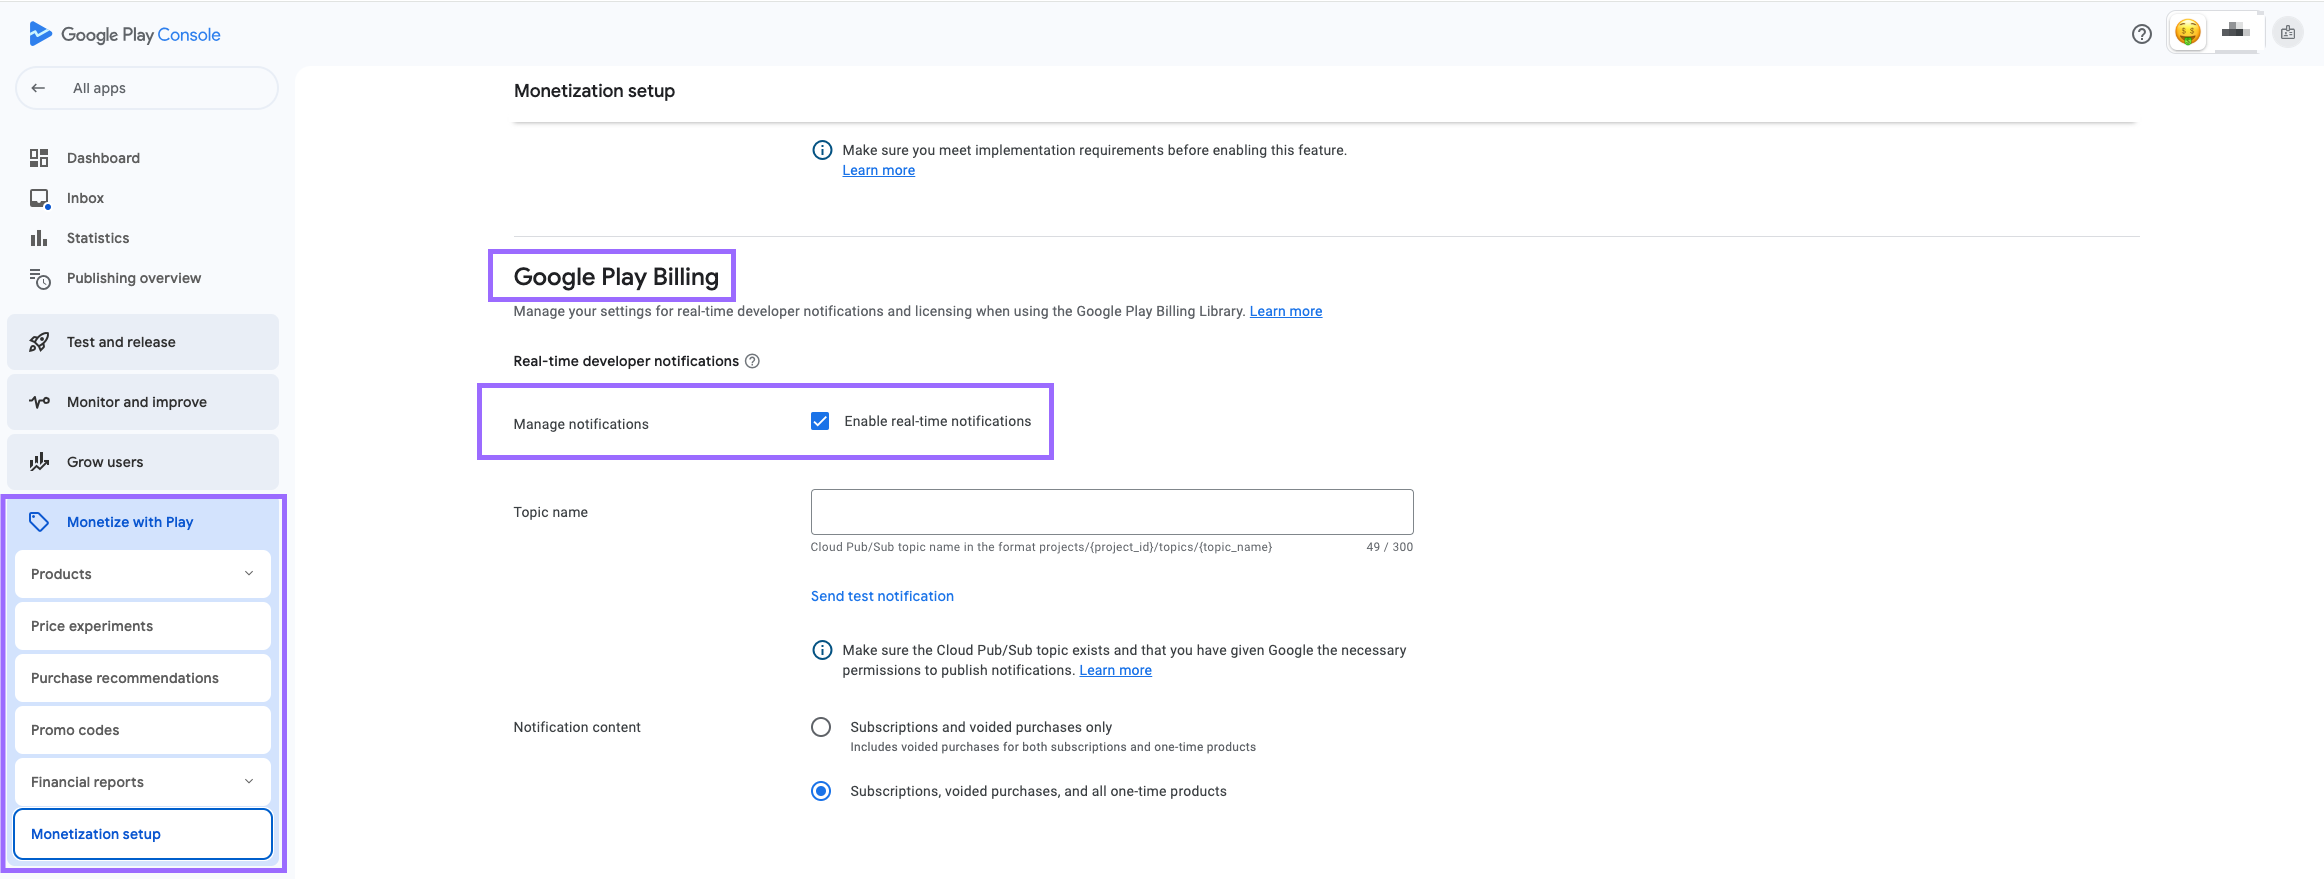
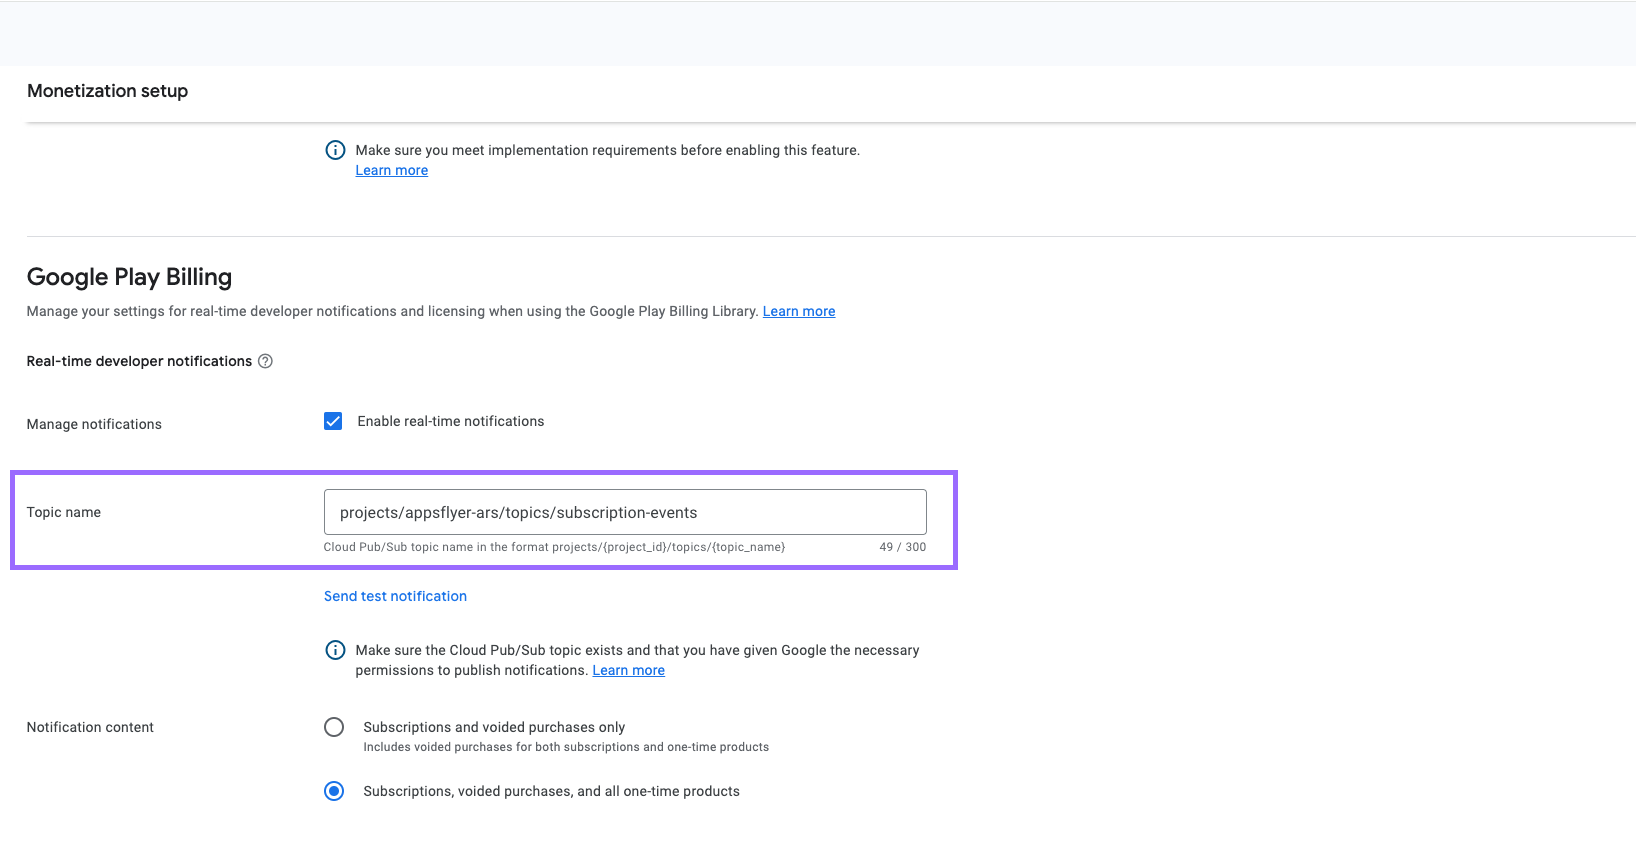
- In the Topic name field, paste the AppsFlyer topic address: projects/appsflyer-ars/topics/subscription-events
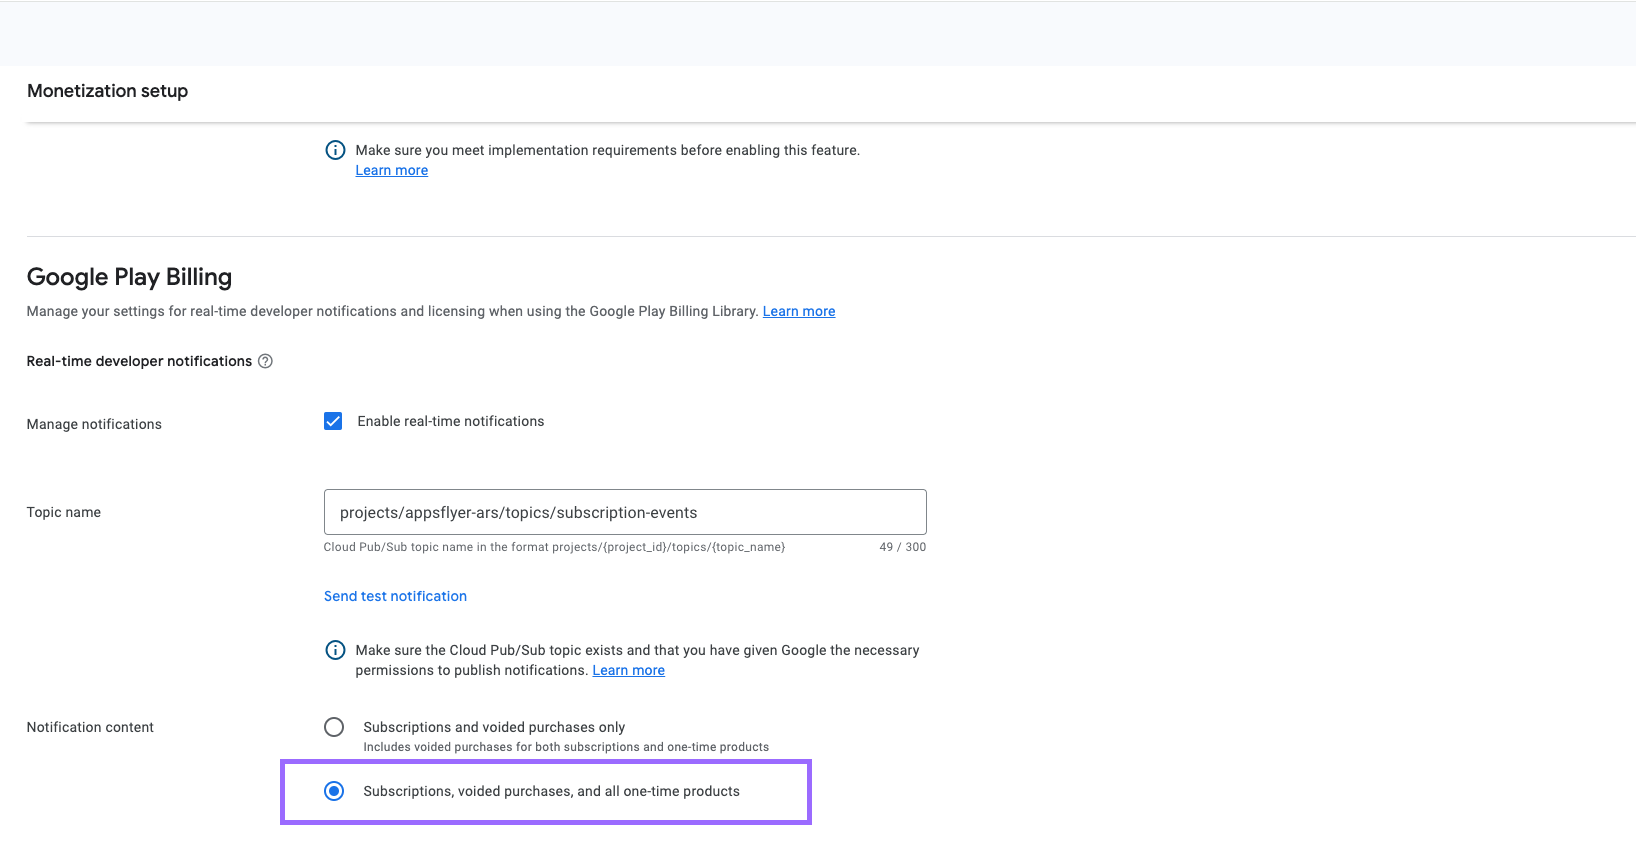
- For Notification content, select Subscriptions, voided purchases, and all one-time products.
- Click Save Changes
It can take time (sometimes even 24 hours) for this to take effect. Therefore, wait before testing.
Step 5. Contact Us
After all completed steps contact our support team via email support@appodeal.com or a live chat with the following information :
- App for which you want to enable ad roi360 feature
- Service account JSON file from Step 2.2;
Optional. Step 6 Setting up AppodealPurchaseCallback
Once the functionality is enabled and configured, when a purchase is made in your app via Google Billing Library, Appodeal SDK will automatically detect, verify and send the inApps/subscription details to Appodeal Dashboard. If you want to receive purchase information in your app, you just need to call the method:
- Kotlin
- Java
Appodeal.setPurchaseListener(object: AppodealPurchaseListener{
    override fun onPurchaseReceived(successPurchases: List<Map<String, Any>>) {
        Log.d("Appodeal App", "onPurchaseReceived: $successPurchases");
    }

    override fun onPurchaseFailed(reason: Throwable, failedPurchases: List<Map<String, Any>>?) {
       Log.d("Appodeal App", "Message: ${reason.message} failedPurchases: $failedPurchases");
    }
})
Appodeal.setPurchaseListener(new AppodealPurchaseListener() {
    @Override
    public void onPurchaseReceived(@NonNull List<Map<String, Object>> successPurchases) {
        Log.d("Appodeal App", "onPurchaseReceived: " + successPurchases);
    }
    @Override
    public void onPurchaseFailed(@NonNull Throwable reason,
                                 @Nullable List<Map<String, Object>> failedPurchases) {
        Log.d("Appodeal App", "Message: " + reason.getMessage() + " failedPurchases: " + failedPurchases);
    }
});
}
The purchase object you get in onPurchaseReceived/onPurchaseFailed is a list of objects
- for InApps purchase:
| Parameter | Description |
|---|---|
| purchase_token | Token of received purchase |
| product_ids | List of purchase ids, |
| product_type | Type of purchase inapp/subs |
| purchase_time | Timestamp of purchase |
| package_name | App package, where purchase was done |
| one_time_purchase_offer_details | Map details of purchase, contains "formatted_price", long "price_amount_micros", "price_currency_code" |
| quantity | Count of purchase items |
| order_id | Order id of received purchase |
| region_code | Code of country of received purchase |
- for Subscription purchase:
| Parameter | Description |
|---|---|
| purchase_token | Token of received subscription |
| product_ids | List of subscription ids, |
| product_type | Type of purchase inapp/subs |
| purchase_time | Timestamp of purchase |
| subscription_offer_details | List of maps which contains details of subscription offers, like "base_plan_id", "offer_tags", "offer_token", "pricing_phases" |
| package_name | app package, where purchase was done |
| one_time_purchase_offer_details | Map details of purchase, contains "formatted_price", long "price_amount_micros", "price_currency_code" |
| latest_order_id | Order id of received subscription |
| subscription_state | Current state of description, example: active |
| start_time | Start date of subscription |
| expiry_time | Expiration date of subscription |
At this point, the connection of automatic purchases is fully completed.
Purchase reports will be automatically uploaded to the Dashboard of your personal cabinet 2 times a day
Manual verification and sending of purchase information
In-App purchase tracking will work only in connection with Adjust/AppsFlyer. To connect them, follow this guide for Adjust and this guide for AppsFlyer.
It's possible to track in-app purchase information and send info to Appodeal servers for analytics. It allows to group users by the fact of purchasing in-apps. This will help you to adjust the ads for such users or simply turn it off, if needed. To make this setting work correctly, please submit the purchase info via the Appodeal SDK.
Step 1. Validate In-app Purchases
To track in-app purchase, Appodeal SDK will need info about purchases provided by the Google Play Billing Library
Add the following dependency into your module-level build.gradle:
- Kotlin
- Groovy
buildscript {
    dependencies {
        // ... other project dependencies
        implementation("com.android.billingclient:billing:5.0.0")
        // or
        implementation("com.android.billingclient:billing-ktx:5.0.0")
    }
}
buildscript {
    dependencies {
        // ... other project dependencies
        implementation 'com.android.billingclient:billing:5.0.0'
        // or
        implementation 'com.android.billingclient:billing-ktx:5.0.0'
    }
}
Get your Purchase and SkuDetails objects from the Google Play Billing Library using the guide. Get a price and currency from SkuDetails.
Create and validate in-app purchase using the method below:
- Kotlin
- Java
// Purchase object is returned by Google API in onPurchasesUpdated() callback
fun validatePurchase(purchase: Purchase) {
    // Create new InAppPurchase with type
    val inAppPurchase: InAppPurchase = InAppPurchase.newBuilder(type = InAppPurchase.Type.InApp)
        .withPublicKey("YOUR_PUBLIC_KEY")
        .withSignature(purchase.signature)
        .withPurchaseData(purchase.originalJson)
        .withPurchaseToken(purchase.purchaseToken)
        .withPurchaseTimestamp(purchase.purchaseTime)
        .withDeveloperPayload(purchase.developerPayload)
        .withOrderId(purchase.orderId)
        .withSku(...) // Stock keeping unit id from Google API
        .withPrice(...) // Price from Stock keeping unit
        .withCurrency(...) // Currency from Stock keeping unit
        .withAdditionalParams(...) // Appodeal In-app event if needed
        .build()
    // Validate Purchase
    Appodeal.validateInAppPurchase(context = context, purchase = inAppPurchase, callback = object : InAppPurchaseValidateCallback {
        override fun onInAppPurchaseValidateSuccess(purchase: InAppPurchase, errors: List<ServiceError>?) {
           // In-App purchase validation was validated successfully by at least one connected service
        }
        override fun onInAppPurchaseValidateFail(purchase: InAppPurchase, errors: List<ServiceError>) {
           // In-App purchase validation was failed by all connected service
        }
    })
}
// Purchase object is returned by Google API in onPurchasesUpdated() callback
public void validatePurchase(Purchase purchase) {
    // Create new InAppPurchase
    InAppPurchase inAppPurchase = InAppPurchase.newBuilder("PURCHASE_TYPE")
            .withPublicKey("YOUR_PUBLIC_KEY")
            .withSignature(purchase.getSignature())
            .withPurchaseData(purchase.getOriginalJson())
            .withPurchaseToken(purchase.getPurchaseToken())
            .withPurchaseTimestamp(purchase.purchaseTime)
            .withDeveloperPayload(purchase.getDeveloperPayload())
            .withOrderId(purchase.getOrderId())
            .withSku(...) // Stock keeping unit id from Google API
            .withPrice(...) // Price from Stock keeping unit
            .withCurrency(...) // Currency from Stock keeping unit
            .withAdditionalParams(...) // Appodeal In-app event if needed
            .build()
    // Validate InApp purchase
    Appodeal.validateInAppPurchase(this, inAppPurchase, new InAppPurchaseValidateCallback() {
        @Override
        public void onInAppPurchaseValidateSuccess(@NonNull InAppPurchase purchase, @Nullable List<ServiceError> errors) {
            // In-App purchase validation was validated successfully by at least one connected service
        }
        @Override
        public void onInAppPurchaseValidateFail(@NonNull InAppPurchase purchase, @NonNull List<ServiceError> errors) {
            // In-App purchase validation was failed by all connected service
        }
    });
}
Please make sure if you have created in-app product in Google Play Console → Monetize section to use:
- InAppPurchase.Type.InApp for purchase type
- InAppPurchase.Type.Subs for subscription
| Parameter | Description | Usage |
|---|---|---|
| purchaseType | Purchase type. Must be InAppPurchase.Type.InApp or InAppPurchase.Type.Subs | Adjust/AppsFlyer |
| publicKey | Public key from Google Developer Console | AppsFlyer |
| signature | Transaction signature (returned from Google API when the purchase is completed) | Adjust/AppsFlyer |
| purchaseData | Product purchased in JSON format (returned from Google API when the purchase is completed) | AppsFlyer |
| purchaseToken | Product purchased token (returned from Google API when the purchase is completed) | Adjust |
| purchaseTimestamp | Product purchased timestamp (returned from Google API when the purchase is completed) | Adjust |
| developerPayload | Product purchased developer payload (returned from Google API when the purchase is completed) | Adjust |
| orderId | Product purchased unique order id for the transaction (returned from Google API when the purchase is completed) | Adjust |
| sku | Stock keeping unit id. | Adjust |
| price | In-app event revenue. | Adjust/AppsFlyer/Appodeal |
| currency | In-app event currency. | Adjust/AppsFlyer/Appodeal |
| additionalParameters | Additional parameters of the in-app event. |
If you are using your own Adjust account you need to complete Step 2 from our Event Tracking guide and create some required events on Adjust side.
Step 2. Generate Json File In Google Cloud
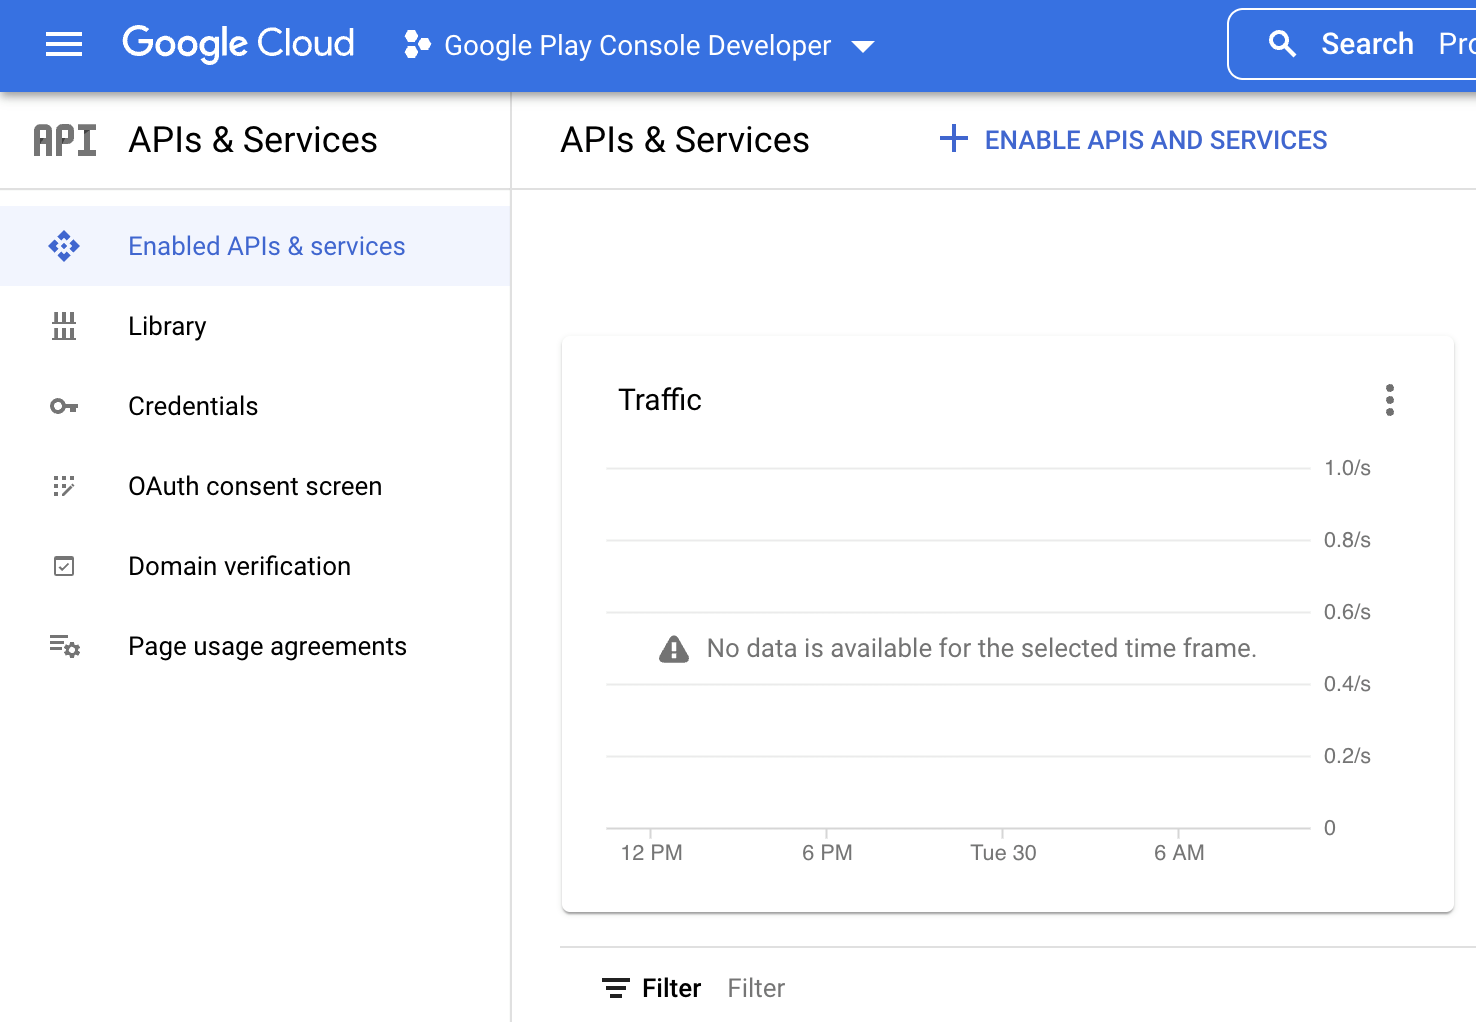
- Login to Google Cloud with your credentials;
- Select Google Play Console Developer project on the top left corner as shown below;
Please make sure to select Google Play Console Developer project at this step instead of your exact app project. Google Play Console only allows to link Google Play Console Developer cloud projects (later in step 3).
- Select Credentials → Create Credentials → select Service Account;
- Select Viewer as a role for Service Account and press Done;
- Go to your service account and press keys → Add key → choose JSON → and send us the JSON file via email support@appodeal.com or a live chat.
Step 3. Add Required Permissions In Google Play Console
-
Go to the ** Google Play Console** and log in;
-
Go to Google Play Console → Manage developer accounts → Choose developer account → Setup → API Access and choose your Google Play Console Developer project from step 2 where you have created your Service Account;
If you are not able to see Google Play Console Developer project in the list then please update the webpage.
If the issue persists, make sure that your Google Play developer account(email) is the owner of the Google Cloud project. You can read more here.
- At the bottom there will be a list of service accounts that are available in this Google Cloud project. Select the one from which the JSON was sent;
Press Refresh if you are not able to see your Service Account.
-
Press View Play Console permissions. In the App Permissions section select the necessary applications where in-app events will be used;
-
Go to Account Permissions section and select all Financial Data permissions:
- View financial data
- Manage Orders, subscriptions
Step 4. Contact Us
After all completed steps contact our support team via email support@appodeal.com or a live chat with the following information :
-
Service account JSON file;
-
Purchases implementation logic in your app (when and where you call validate method and validate purchases);
-
Send us the purchase testing access through the Google Developer console to email support@appodeal.com;
-
Your apk in a zip for testing.
Step 5. Testing
After you have contacted our Support Team and provided all the required information you can test your app to make sure purchases are validated.
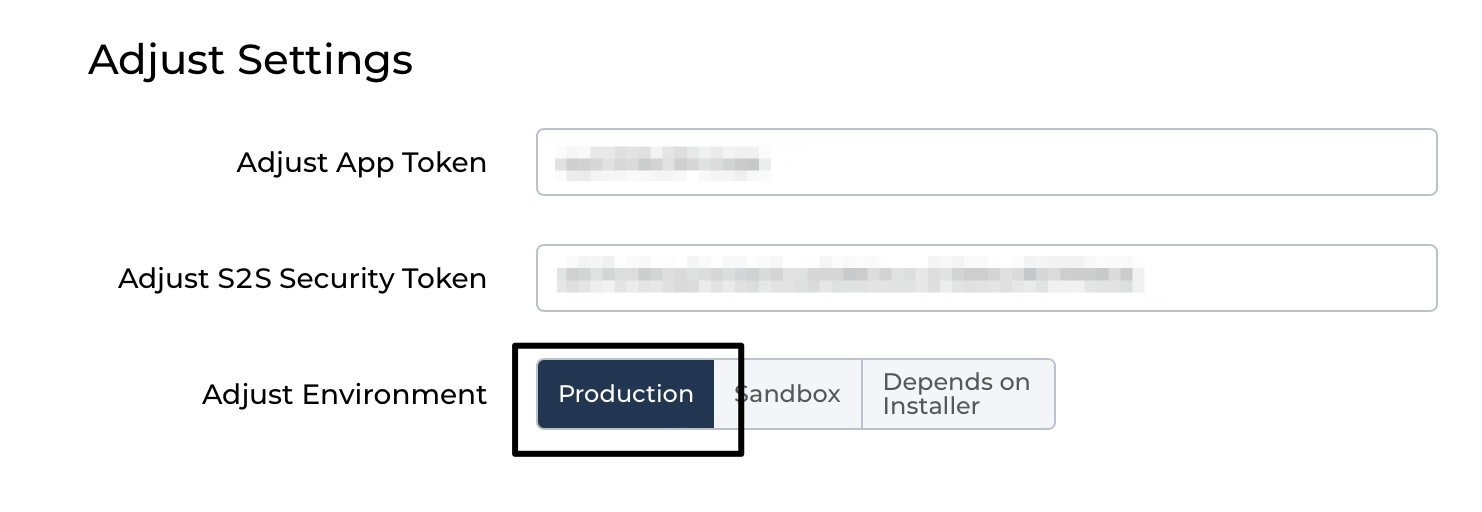
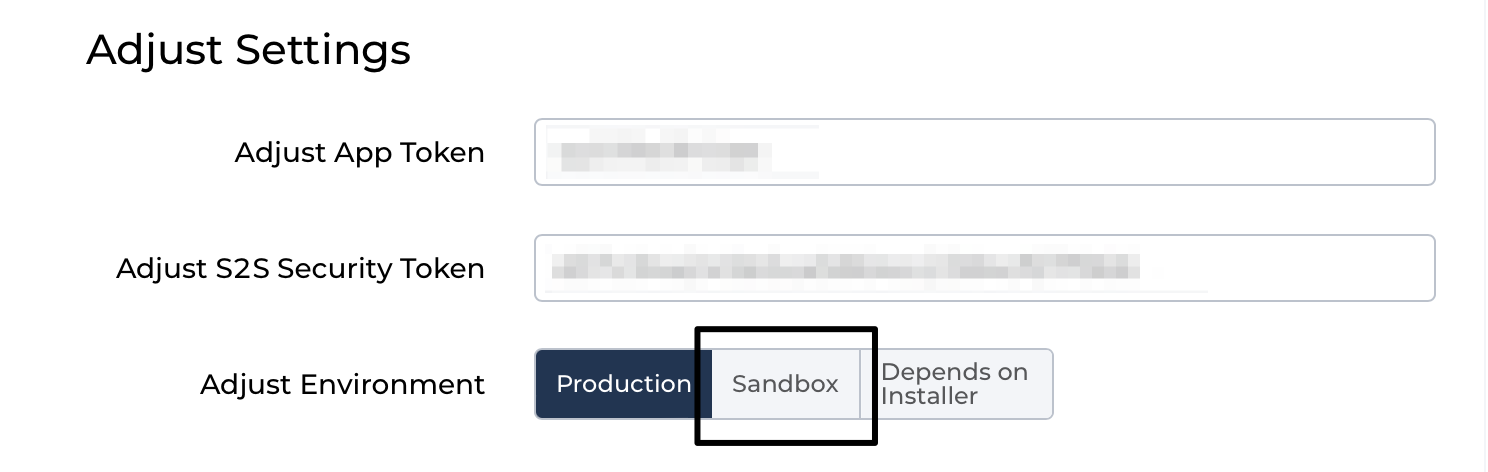
- Please go to your App Settings → Attribution Settings → and change Adjust Environment from Production to Sandbox to be able to test validation and don't forget to press Save at the end of the page;
- Connect your device to your computer with the opened console (Android Studio logcat) and tag logs by purchase;

-
Now you can open your App and make a test purchase, if you can see Valid purchase in the console, then validation went successfully;
-
If validation has failed, then please recheck all the steps above;
-
After testing, change your Adjust Environment to Production in App Settings → Attribution Settings.